-
Notifications
You must be signed in to change notification settings - Fork 0
ZG SWTOR Tools Installation and Status Panel
This Add-on is installed as any other Blender one. It needs us to set a Preference to make it aware of our SWTOR assets stash' location in our computer.
This Add-on assumes a Blender 3.6 version as the very minimum, up to 4.2 depending on the companion .gr2 Importer Add-on's own level of compatibility. Several of its tools ought to work on older versions of Blender, though.
Remember that we can have several versions of Blender installed at once without any trouble, as Blender keeps each version's preferences and add-ons isolated from each other.
The installation of the ZG SWTOR Tools Add-on in Blender is quite simple:
-
Download the Add-on's "zg_swtors_tool.zip" file from this link. Don't unZip it: it's used as such .zip.
-
In Blender, go to
Edit menu > Preferences option > Add-ons tab > Install… button. -
Select the Add-on in the file dialog box and click on the
Install Add-on button. -
The Add-on will appear in the Add-ons list with its checkbox un-ticked. Tick it to enable the Add-on.
-
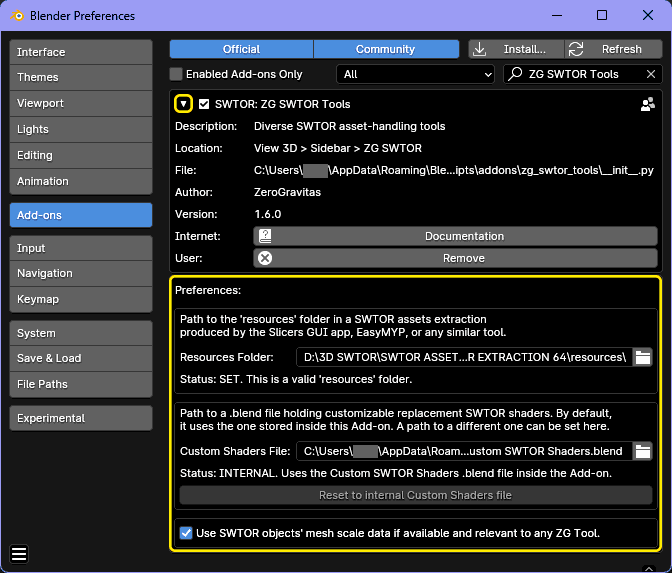
Twirl the arrow preceding the check-box to reveal some information and, most importantly, the Add-on's Preference settings. Filling those is crucial for some of the tools to work correctly. They are:


-
Path of a "resources" folder: some of the Add-on's features depend on looking for information and game assets inside a SWTOR assets extraction (typically produced by apps such as SWTOR Slicers or EasyMYP). In the case of a SWTOR Slicers extraction, the "resources" folder is inside the folder set as that app's Output Folder.
Click on the folder icon to produce a file browser window where to locate the "resources" folder, or type or copy its path inside the folderpath field.
-
Path to a Custom Shaders .blend file (if any): only required by a couple of tools that allow us to replace the current .gr2 Add-on's modern SWTOR shaders with customizable ones held in one Blender file, meant for us to experiment with and improve upon.
By default, a .blend file contained inside the Add-on will be used, but we can select an external file, too, by clicking on the file icon to produce a file browser window, or by typing or pasting its path inside the filepath field.
If a external file (or no file at all) is selected, a button lets us easily revert to the internal one.

-
Use SWTOR objects' mesh scale data: this has to do with the new features of our companion .gr2 importer Add-on, which is the one doing the actual importing of objects and characters under this Add-on's tools' hood. It's ticked by default and can be left mostly ignored. Its implications are explained further on in this page, and prologue the page about the Object Tools.
-
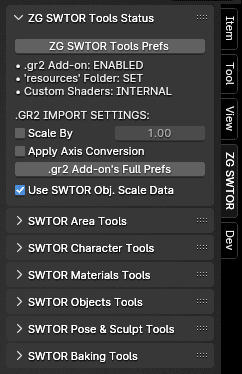
The Add-on's tools will appear in the 3D Viewport's Sidebar ('n' key), in the "ZG SWTOR" tab (plus as a few specific tools in the Shader Editor's Sidebar, too).


As some of the tools rely on having certain elements at hand (set in either this Add-on's Preferences or in Blender itself), this panel shows if they effectively are set so:
-
.gr2 Addon: meaning Darth Atroxa's .gr2 Importer Add-on. Only a few tools need it to be enabled: the Area Assembler and the Character Assembler, and the Process named Materials and Convert to Custom Shaders. They'll appear disabled and with red color text to warn us about it.
-
'resources' Folder: this refers to the folder containing the game assets extracted from SWTOR via the Slicers GUI app (it's typically inside the folder designated as Output Folder in that app) or the old EasyMYP.
Notice that we can have several 'resources' folders and switch between them at will. There are reasons why we would want that: Broadsword is doing some "renovating" in the game, replacing objects and materials, such as the giant statues on Korriban, without keeping the original ones. We could want to preserve them and keep them at hand (once imported into a Blender project, Blender will keep track of what came from where, which lets us keep on switching 'resources' folders at will).
-
Custom Shaders: it refers to the .blend file holding the Customizable versions of the current modern SWTOR shaders that is included inside the Add-on (but can also be an external file). Normally, this file will be selected by default, satisfying the requirement.
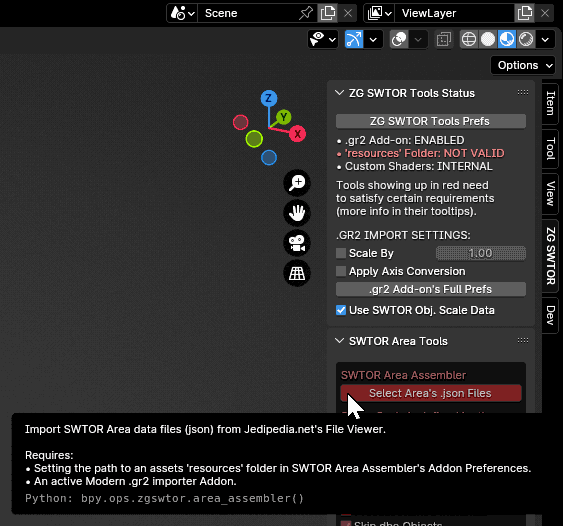
When lacking any of these elements, the panel will say so. We can use the Add-on's Preferences button to go directly to this Add-on's Preferences to correct the situation. Not all tools require those elements: any specific tool that does will color itself red when they aren't present. Hover the cursor over them to produce helping tooltips showing what their needs are.

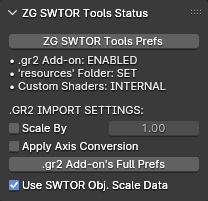
Given the new .gr2 Importer Add-on's features, we've added a new section to the Status panel giving direct access to some of its Preferences' settings, plus a button that opens its full Preferences panel (the section appears only when this new version of the Add-on is enabled). The exposed settings are:
-
Scale By: scales all object/armature imports by a factor at the mesh level, which spares us dealing with scale inheritance issues.
-
Scale factor: the scaling factor.
-
'Apply' Axis Conversion: does a z-is-up x=90º rotation at the mesh level instead of at the object level, which spares us dealing with rotation inheritance issues.
The .gr2 Add-on's values that match those of previous versions of the importer:
- Scale Factor = 1.0 (no matter if Scale By is on or off).
- Apply Axis Conversion = unticked ("False")
These settings affect any tool that imports objects into the scene, such as the Area Assembler or the Character Assembler, and any tool that has to deal with the scale of objects (all the Object Tools). Their sections in this guide explain how they interact with them. There's also a thorough explanation in that Add-on's guide in this wiki.
- Use SWTOR Object's Scale Data: this option, ticked by default, makes the Objects Tool use scale and axis conversion information that was recorded in any imported SWTOR objects by the new importer Add-on, so as to avoid any mismatch between its current settings and the ones the objects were annotated with. Unticking it lets us have the current settings override them.
We've noticed that Blender translates to other languages elements that other apps typically wouldn't, such as shader nodes' names, which breaks some of our Add-ons. There are ways to solve that, but we have yet to implement and test them.
We do not condone the usage of our tools for malicious intent, including: exploits, harassment of others, or anything else that may violate EA/Bioware's EULA, TOS, DSA, Privacy Policy Copyrights, Trademarks, or anything else illegal. We will not be held accountable for your actions, and will act against you if nessesary.
- Home.
- State of Play September 2024
- Getting Help:
IMPORTING SWTOR MODELS INTO BLENDER: A BRIEF OVERVIEW.
Check this intro first. Afterwards, you can jump directly to the guides on extracting PCs, NPCs and others.
No need to read this section right now: each extracting/assembling guide explains its required tools anyway.
- Slicers GUI (Windows app).
-
Blender 3D (multiplatform app):
Which version. How to learn. Installing our Add-ons. -
SWTOR .gr2 Objects Importer Add-on.
Required by all the other add-ons. - SWTOR Character Assembler Add-on.
- SWTOR Area Assembler Add-on.
-
ZeroGravitas SWTOR Tools Add-on.
Includes the Character and Area Assemblers plus other diverse tools.
-
Jedipedia.net:
- SWTOR Database.
- File Reader.
- World Viewer.
-
TORCommunity.com:
- SWTOR Database.
- Character Designer.
- NPC viewer's Exporter.
- EasyMYP (Windows app).
- Noesis (Windows app).
READ THE BROAD STROKES FIRST: YOU'LL SEE IT'S EASIER THAN YOU THINK!
-
The steps:
- Installing Slicers GUI and extracting SWTOR's game assets.
-
Using TORCommunity's Character Designer to export Player Characters.
- IF ARMOR SELECTION SEARCH IS DOWN: workaround to manually specify Armor Sets.
- Using TORCommunity's NPCs Database to export Non Playable Characters.
- Using our Blender add-ons to auto-assemble the model.
- Rigging the character for posing and animation
- Applying SWTOR animations to the character.
-
Extra steps that require manual work and some knowledge of SWTOR's assets:
-
Making capes and hair work, manually and through Cloth Simulation.
-
Attaching weapons and other objects to a character with a SWTOR rig.
-
Attaching weapons and other objects to a character with a custom rig.
-
Baking the models' textures and exporting to other apps:
- Baking with Legacy SWTOR materials and modern ones.
- Baking the multiple materials of an object into a single one.
- Exporting to VRChat.
- Exporting to Star Wars Battlefront II.
- Exporting to Unreal Engine.
- Exporting to Garry's Mod.
- Exporting to Tabletop Simulator.
-
3D Printing:
-
- Locating armor parts' assets
- Locating weapons' assets.
- Assigning materials and textures to environmental and architectural elements, furniture, props, ships, vehicles and weapons.
- Assembling multi-part assets (Decorations, Rooms, etc).
- Generic guide to importing objects and assigning materials (Legacy Add-on-based. Needs updating).
- Snippets.
- Improving and customizing our SWTOR models and materials.
- Other Extracting Strategies (needs updating).
- SWTOR Materials recipes:
Modding isn't working at the moment due to SWTOR's change to a 64bit codebase. It's going to take a while 🙁.
- Overview.
- Tools.
- Other techniques:
- Modding SWTOR textures with Special K (CAUTION).
- Overview.
- Tools.
- File Formats
- A look at SWTOR's Materials and Texture Files.