-
Notifications
You must be signed in to change notification settings - Fork 0
ZG SWTOR Pose and Sculpt Tools
This panel holds minor tools having to do with posing or sculpting. Some of them SWTOR-specific, some simply a few already existing Blender tools that are a little too buried inside their panels or require several steps that would be nice to have more at hand. We'll see what else we can come up with.

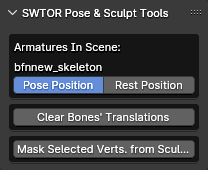
- Armatures In Scene's Pose/Rest Position.
- Clear Bones' Translations.
- Mask Selected Vertices From Sculpting.

- The presence of armatures in the scene.
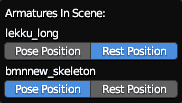
It shows the Pose Position and Rest Position buttons of all the armatures (skeletons) in the scene without the need to select them one by one to make their individual pose/rest settings show up in the Properties panel.

- A SWTOR armature ("Skeletons").
Clears all translation data from all bones in an armature and, if animated, all the keyframes' translations, leaving the rotation and scaling data intact. it's meant to correct imperfections in imported animations that distort characters' bodies (they might need manual adjustments afterwards, to compensate for what the translations added to the poses).
It doesn't affect the GrannyRootBone, Master, Bip01, Root and RootSpine bones that contribute to major movements across the stage.
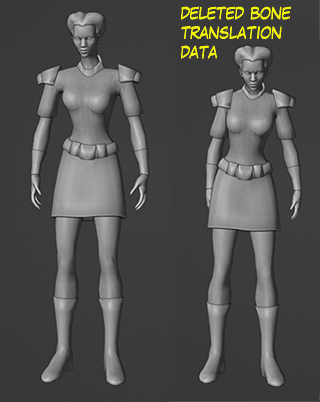
In the following image we can see the results of loading a problematic animation to a Body Type 2 female: the bones have moved so much that the body and limbs are severely elongated. By deleting the translation data, we recover the original proportions of the character, if the pose has been left somewhat altered and will need readjusting:


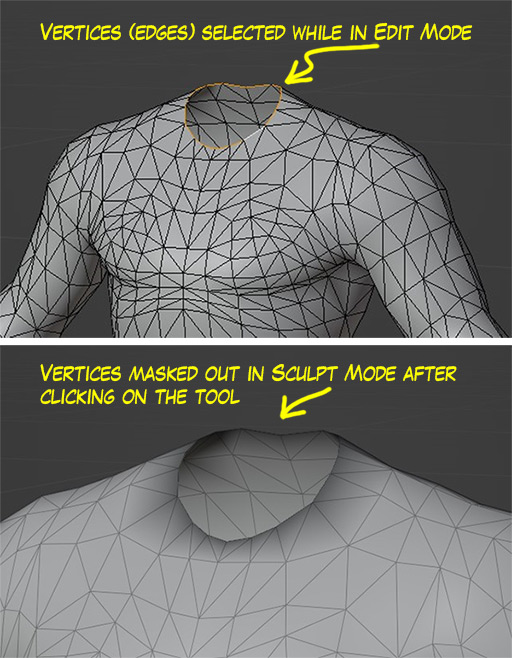
- An active selection of vertices set while in Edit Mode. The button is meant to be clicked while in Sculpt Mode, though.
This is a tool that maybe doesn't need to exist, as Blender might offer a better way to do it already. Still… The way it works is based on the fact that if you do a selection of vertices while in Edit Mode, that selection persists after switching to Sculpt Mode (and others).
What this tool does is inverse-mask those vertices (that is, mask everything else) so that they are protected from any sculpting tool's brushstrokes.

The motivation behind this was to be able to deform characters' objects (say, swole up a SWTOR Body Type 2 (bmn or bfn) to a BT 2.5 of sorts, or change their facial features) without affecting crucial areas such as the torso-to-head neck or other body parts' seams' matching vertices, or the eyelids and mouth's edges.
Normally, we might fuse the body parts into a single mesh and don't care about the seams anymore, but we might want, for example, to make a reusable modified torso part whose neck base's edge still fits all head objects' necks.
By selecting the relevant vertices in Edit Mode (even maybe saving them as a vertex group for easy recall), we can quickly protect or unprotect them at the press of a button while in Sculpt Mode.
We do not condone the usage of our tools for malicious intent, including: exploits, harassment of others, or anything else that may violate EA/Bioware's EULA, TOS, DSA, Privacy Policy Copyrights, Trademarks, or anything else illegal. We will not be held accountable for your actions, and will act against you if nessesary.
- Home.
- State of Play September 2024
- Getting Help:
IMPORTING SWTOR MODELS INTO BLENDER: A BRIEF OVERVIEW.
Check this intro first. Afterwards, you can jump directly to the guides on extracting PCs, NPCs and others.
No need to read this section right now: each extracting/assembling guide explains its required tools anyway.
- Slicers GUI (Windows app).
-
Blender 3D (multiplatform app):
Which version. How to learn. Installing our Add-ons. -
SWTOR .gr2 Objects Importer Add-on.
Required by all the other add-ons. - SWTOR Character Assembler Add-on.
- SWTOR Area Assembler Add-on.
-
ZeroGravitas SWTOR Tools Add-on.
Includes the Character and Area Assemblers plus other diverse tools.
-
Jedipedia.net:
- SWTOR Database.
- File Reader.
- World Viewer.
-
TORCommunity.com:
- SWTOR Database.
- Character Designer.
- NPC viewer's Exporter.
- EasyMYP (Windows app).
- Noesis (Windows app).
READ THE BROAD STROKES FIRST: YOU'LL SEE IT'S EASIER THAN YOU THINK!
-
The steps:
- Installing Slicers GUI and extracting SWTOR's game assets.
-
Using TORCommunity's Character Designer to export Player Characters.
- IF ARMOR SELECTION SEARCH IS DOWN: workaround to manually specify Armor Sets.
- Using TORCommunity's NPCs Database to export Non Playable Characters.
- Using our Blender add-ons to auto-assemble the model.
- Rigging the character for posing and animation
- Applying SWTOR animations to the character.
-
Extra steps that require manual work and some knowledge of SWTOR's assets:
-
Making capes and hair work, manually and through Cloth Simulation.
-
Attaching weapons and other objects to a character with a SWTOR rig.
-
Attaching weapons and other objects to a character with a custom rig.
-
Baking the models' textures and exporting to other apps:
- Baking with Legacy SWTOR materials and modern ones.
- Baking the multiple materials of an object into a single one.
- Exporting to VRChat.
- Exporting to Star Wars Battlefront II.
- Exporting to Unreal Engine.
- Exporting to Garry's Mod.
- Exporting to Tabletop Simulator.
-
3D Printing:
-
- Locating armor parts' assets
- Locating weapons' assets.
- Assigning materials and textures to environmental and architectural elements, furniture, props, ships, vehicles and weapons.
- Assembling multi-part assets (Decorations, Rooms, etc).
- Generic guide to importing objects and assigning materials (Legacy Add-on-based. Needs updating).
- Snippets.
- Improving and customizing our SWTOR models and materials.
- Other Extracting Strategies (needs updating).
- SWTOR Materials recipes:
Modding isn't working at the moment due to SWTOR's change to a 64bit codebase. It's going to take a while 🙁.
- Overview.
- Tools.
- Other techniques:
- Modding SWTOR textures with Special K (CAUTION).
- Overview.
- Tools.
- File Formats
- A look at SWTOR's Materials and Texture Files.