Releases: trackmate-sc/TrackMate
TrackMate-7.13.0
What's Changed
- Export label images on 32-bit float type. by @tinevez in #269
- More ways of assigning IDs to label when exporting label image by @tinevez in #291
- Fix MATLAB functions - let them import ROIs from TrackMate >= v7 by @tinevez in #293
- Export to CSV file in a headless mode by @tinevez in #290
- Utilities to simplify the integration of command-line tools in TrackMate modules by @tinevez in #299
Full Changelog: TrackMate-7.12.0...TrackMate-7.13.0
Contributors
Assets 2
TrackMate v7.12.0: support for 32-bit images with NaNs
This is a minor release of TrackMate, that ships various utilities and improvements, and mainly the proper support of 32-bit images with NaNs. This should facilitate the analysis of images coming from molecular imaging like FRET, FLIM, ... where pixels with NaN are occuring.
What's Changed
- Better shortcuts to navigate and edit tracking data. by @tinevez in #276
- export table filename by @gletort in #281
- Ignore NaNs in images when computing intensity-related features. by @tinevez in #286
- Add an option to capture overlay with a white background. Fix #274
Full Changelog: TrackMate-7.11.1...TrackMate-7.12.0
Contributors
Assets 2
TrackMate v7.10.0: new tracker, new gap-closing algo and breaking API
TrackMate v7.7.0: New Hessian detector and new actions.
This new version focuses on bringing new feature to TrackMate.
Mainly:
- A new spot detector, based on the determinant of the Hessian (DoH), the Hessian detector.
- A new action that can measure the distance from spots to ROIs, possibly over time.
- A new option in the label exporter that allows setting the label IDs from the spot IDs.
A new spot detector based on the determinant of Hessian (DoH).
A. Principle.
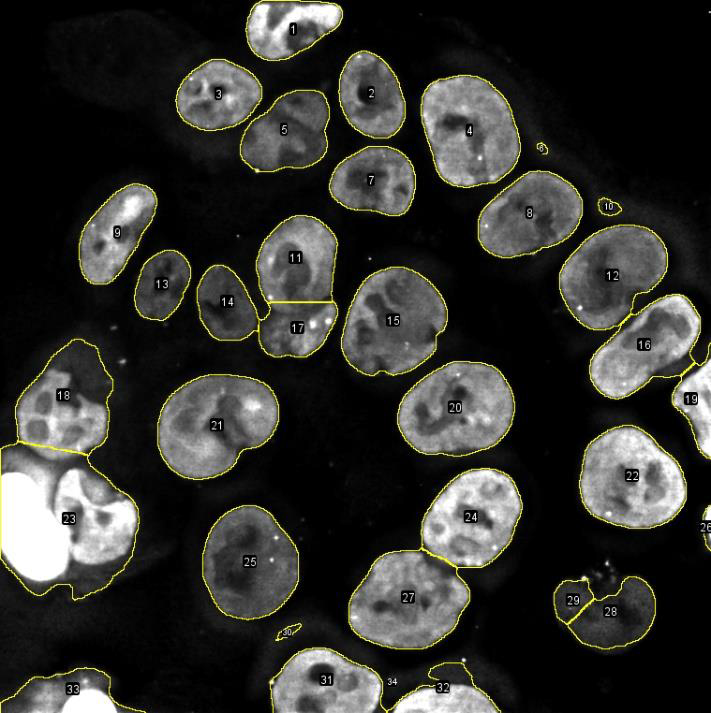
Sometimes one needs to detect bright spots that are not very bright, in a low SNR image, with a lot of unspecific signal:

In the image above, we observe a rather strong non-specific signal in the whole nuclei. The intensity of this non-specific signal versus the background is close to the intensity of the spot signal versus the non-specific signal. Even the nucleus in the image does not look happy about it.
The non-specific signal generates clear and sharp edges at the border of the nucleus, which is picked-up by the LoG detector, with unfortunately a high quality. Our goal is to come up with a better detector, with a better edge response elimination. After some tests I came up with a detector based on the determinant of the Hessian matrix.
The Hessian matrix of an image is a tensor made of the combinations of the 2nd derivatives of the intensity in all directions at each pixel of the source image. So, if f is the intensity, we have at each pixel:

(Note that it is a real, symmetric matrix.) This matrix measures the ‘local curvature’ of the intensity. In a hand-waving explanation, let’s suppose we work in 2D and that the intensity is actually the height of a surface. And let’s consider the height variation in only the 2 principal directions, that we suppose are aligned with the X and Y axes. A bright spot in the source image corresponds to a sharp peak in our surface analogy. At the top of this peak, the curvature is high in absolute value along X and negative: the height increases a lot then decreases immediately after the peak. So, the curvature hxx has a large absolute value. The same along the Y direction.
Let’s suppose now we compute the curvature not on a peak, but on a bright line aligned with the Y axis. In this case the curvature is still high along the X axis: When we cross the line, the height increases and decreases immediately. But along the Y axis, the as we follow the line, the height does not change and the curvature is 0. If we have an edge along the Y axis instead of a line, the situation is the same: the curvature is high when we cross the edge along X, but 0 along Y.
If we now extend our analogy to a surface mapped in 3D, we still have peaks and lines in 3D, but also have planes and plateaus. Let’s suppose we have a plane aligned with YZ. In this case the intensity changes a lot when we cross it following the X axis, so the curvature hxx is high. As we follow the plane along Y and X, the curvatures hyy and hzz are 0. The same for a plateau aligned with YZ.
In summary, in 3D, if we consider the absolute values of the 3 variables hxx, hyy and hzz:
- The 3 values are high in absolute value for a bright peak.
- Two of them are small for a plane or plateau.
- One of them is small for a line or an edge.
- In a homogeneous region of the image, all of them are small.
We can therefore build a spot detector that exploit this fact by taking the product of the 3 curvatures. The product will be comparatively higher only for locations at which we have a bright spot, and should offer a much lower value for plateaus and edges. The analogy above works if the principal directions are aligned with the X, Y and Z axes. When they are not, we can diagonalize the Hessian matrix (we can, it is real and symmetric) and use the eigenvalues instead. But since we are computing the product of the eigenvalues, we can take the determinant of the matrix and skip the diagonalization step to be faster.
The new detector is based on this calculation:
https://github.com/fiji/TrackMate/blob/hessian-detector/src/main/java/fiji/plugin/trackmate/detection/HessianDetector.java#L146-L228
This idea is absolutely not new. Lindeberg [1] already proposed it in the 90s along the LoG detector we have been using so far. I merely extended it to 3D. Mikolajczyk and Schmidt [2] noted that the determinant of the Hessian has indeed a stronger specificity to blobs in images with many spurious structures. Also, if this new detector is based on the product of the eigenvalues (determinant of H), the LoG detector is based on the sum of the eigenvalues (trace of H).
B. In TrackMate.
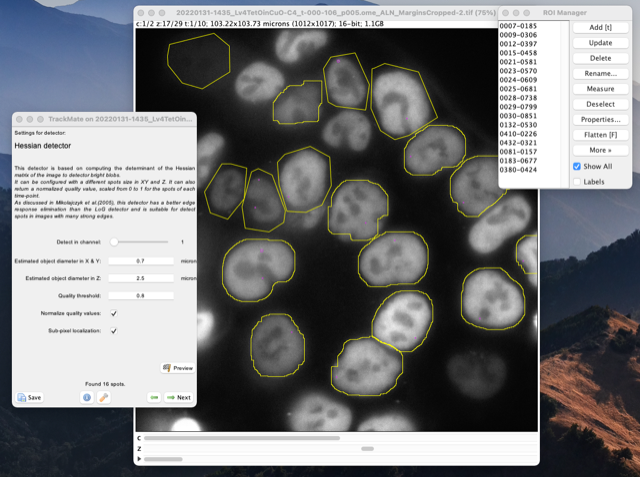
TrackMate will show a new detector with a specific configuration panel:


Spot size in XY and Z.
This detector allows configuring a different size of spots in XY and Z, to account or the elongation along Z.
Normalizing the quality value.
Also, there is a checkbox that normalizes all the pixel values of the Hessian determinant image between 0 and 1 for each time-point separately. With this checked, the spot with the highest quality will have a quality of 1. (It is possible that it gets a lower quality if you use a complex region of interest where a bright spot would be in the bounding box of the ROI, but outside the ROI.)
This will help dealing with the high bleaching we observe. Indeed, here is an example of a movie where we have bleaching. If we look at the mean intensity over time, we get this:

The mean intensity is divided by 5 from start to end, so if set a threshold on quality based on the first time-point, it is likely that we will miss relevant spots at later time-points. Inversely, if we set a threshold based on later time-point, we will have many spurious spots in the first time-points that will complicate tracking later on. If you select the ‘normalize’ option, all spots will have a quality that ranges from 0 to 1 in all time-points, which will mitigate the negative impact of bleaching.
The Hessian detector can process ROIs separately.
This is super important, in particular in conjunction with the quality normalization above.
If you have the ROI manager open when you use the Hessian detector, it will treat each ROI in the list separately, and ignore part of the images that are not in a ROI.
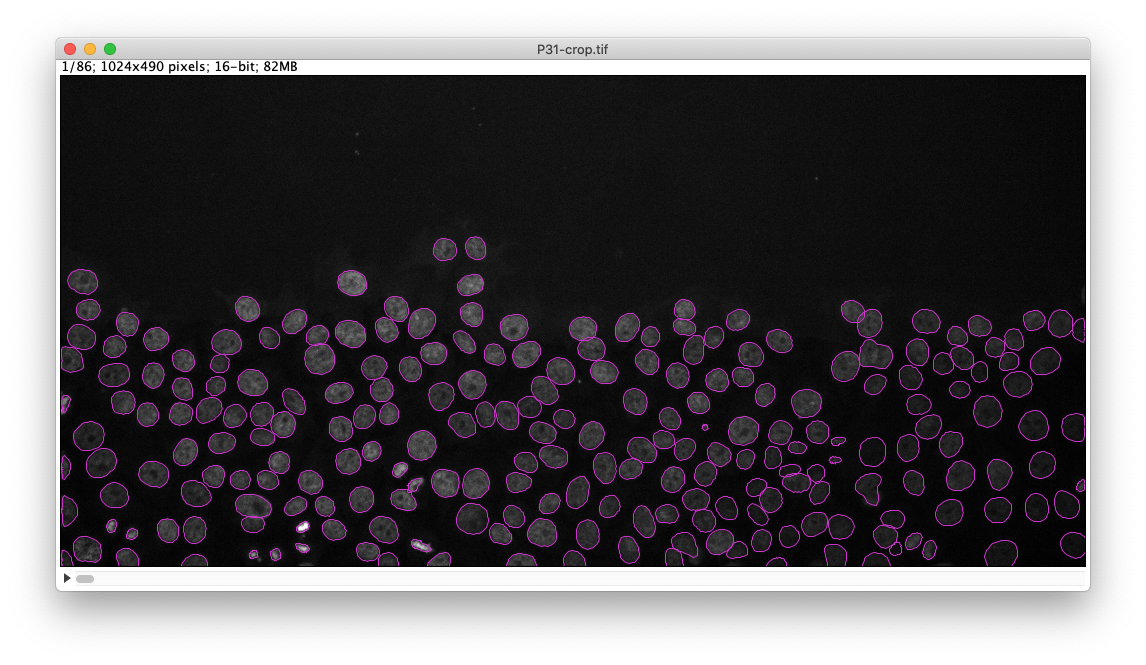
This is incredibly useful for instance when tracking individual spots inside multiple cells in the field-of-view, as illustrated below:
Or like this:
C. Basic comparison with the LoG detector.
Now we want to check whether the Hessian detector is indeed more specific than the LoG detector. What you will see below use the parameters in the image above. I selected the Z slice in which
the spot we are tracking is present. Below you can see the results of the LoG filter (left) and the Hessian determinant (right), computed on the single cell shown above and with min & max display set from 0 to 1 and with the ‘fire’ LUT:


Both filtered images display a strong response at the spot location. However, it is clear that the LoG image has also a strong response in many other places. For instance, we observe a strong response near the edges of the nucleus. We also observe intermediate response inside the nucleus, that tends to increase local contrast this way. The Hessian image however is very specific. We only see one bright spot, and a few faint dots on the edge border. But these spurious dots are far less intense than their LoG counterpart, and they will therefore yield spots with a very low quality, making it easy to filter them out. This is confirmed by looking at the histogram of the two filtered images:


The histogram for the LoG image is very broad, while the ones from the Hessian determinant is thin. The spot quality values will be taken from the histogram, and we see that it will be easier to separate the few real spots from spurious ones on the Hessian determinant histogram. (This illustration with the histograms is inaccurate, there is not a single bin per spot, but it gives an idea.)
D. Limitations.
Also, the Hessian detector is much more demanding in terms of memory. The LoG computation can be expressed in terms of linear filtering, and uses just one convolution. To compute the Hessian matrix, we need to have the following intermediate images (in 3D):
- If the region of interest (ROI) in the source image is W x H x D pixels with 16-bit values.
- The computation of the gradients requires 3 images of size W x H x D pixels with 32-bit values (computation on floats).
- The computation of the Hessian requires one image of size W x H x D x 6 pixels with 32-bit values. The last dimension is used to store the second derivative. Because the Hessian matrix is symmetric, we only need to store the 6...
Contributors
Assets 2
TrackMate-7.6.1: better remember files saved and loaded and don't kill the ROI.
Improvements
- TrackMate better remembers where you last saved and what you last loaded.
- Do not kill or replace the ROI in the source image.
Another positive consequence is that the ROI can be modified in detector config panel. This lets the user also adjust the ROI with detection preview.
TrackMate v7.6.0:
This release contains mainly small bugfixes and one new action.
New features
Automatic renaming of spots.
There is now an action that rename spots in batch based on specific rules.

Three simple rules are implemented for now.

The first one simply copies the track name to all its spots name. (You can edit the track name in the track table or in TrackScheme.)

The second one is based on the lineage. After a division (or 'split' events), the daughter objects will receive the name of the parent object, with 'a', b', etc. suffixed to the name. The letters appended ('a', 'b', ...) are assigned by taking the X position of the sibling objects (the leftmost one receive 'a', etc).

The third one is derived from the second one. On top of appending with a letter reflecting the hierarchy, an integer is suffixed that represent the spot position in the branch. For instance the first spot in the branch could be named Track_12.a.1, the second 'Track_12.a.2` etc.

This will be especially useful when post-processing tracking results in specific track analysis software.
Bugfixes
- Do not crash when running global detectors on a subset of time-points.
- Fix incorrect channel being used in the Spot Gaussian fitter action.
- Fix the track name comparison crashing with empty track names.
- Fix typos in feature names:
CONFINMENT_RATIOfixed inCONFINEMENT_RATIOMANUAL_EGE_COLORfixed inMANUAL_EDGE_COLOR
TrackMate v7.5.1: new actions to export results and settings persistence.
Changes since the v7.1.0
New features.
An action to export a TrackMate session to the Cell-Tracking-Challenge file format.
The cell-tracking challenge website (http://celltrackingchallenge.net/) and paper (https://www.nature.com/articles/nmeth.4473) define a series of metrics on tracking results that help assessing the performance of a tracking pipeline.
This action exports the TrackMate results into a file structure that can be used with the Cell-Tracking Challenge tools.
I acknowledge the great support of the great Vladimir Ulman when building this action.
An action to export the tracking results to a MotilityLab spreadsheet.
MotilityLab is a R application that performs track analysis. It offers many facilities and features that we do not have in TrackMate. One instance is running into a website: http://www.motilitylab.net/startpage.php
There is now an action that facilitates importing TrackMate data into MotilityLab. One of the way to import data into the website is to copy-paste a spreadsheet with specified columns in a given order and format.
This action displays the current tracking results in such a spreadsheet, with the columns pre-formatted, so that it can directly copy-pasted in the website without any extra manipulation.
- In the TrackMate table:
Ctrl+A,Ctrl+C - In the MotilityLab import page:
Ctrl+V


An action to export tracking results to Image1 ROIs.
Can be configured to export everything, or just a selection.

TrackMate remember parameters between runs.
The parameters used in the GUI are saved and reused the next time you launch TrackMate.
To do this, the settings are saved to a XML file in your home folder, and updated every-time you change panel in the UI.
The file can be found in the .trackmate folder in your home directory, under that name lastusedsettings.xml. It uses the same format that in the TrackMate XML files. It can be safely manually edited. If you run into an issue with weird TrackMate behaviors when launching TrackMate, delete it.

<?xml version="1.0" encoding="UTF-8"?>
<TrackMate version="7.5.0">
  <Settings>
    <ImageData filename="TCellsMigration.tif" folder="C:\Users\tinevez\Desktop\TrackMateDLPaper\DemoDatasets\StarDistDetectorCustom\" width="1344" height="1024" nslices="1" nframes="21" pixelwidth="0.6450002483250956" pixelheight="0.6450002483250956" voxeldepth="1.0" timeinterval="1.0" />
    <BasicSettings xstart="0" xend="1343" ystart="0" yend="1023" zstart="0" zend="0" tstart="0" tend="20" />
    <DetectorSettings DETECTOR_NAME="DOG_DETECTOR" TARGET_CHANNEL="1" RADIUS="5.0" THRESHOLD="0.0" DO_MEDIAN_FILTERING="false" DO_SUBPIXEL_LOCALIZATION="true" />
    <InitialSpotFilter feature="QUALITY" value="3.216140548904221" isabove="true" />
    <SpotFilterCollection>
      <Filter feature="QUALITY" value="10.389729536115917" isabove="true" />
    </SpotFilterCollection>
Bugfixes
- Add a safeguard when saving against badly defined features.
It is possible to reach the save point with features that have been improperly defined. For instance, a feature might not have declared itsisIntflag. This happens for instance when analyzing an image
with two channels, but forgetting to call the#setNChannels( 2 )method of the SpotIntensityMultiCAnalyzerFactory.
This is undesirable but it should not prevent users from saving the data. This commit adds a safeguard that prevents TrackMate from crashing with such features when saving. - Fix a bug causing fading tracks in Z not to work if the fading of tracks in time was used.
- Fix bug in the LoG and DoG detector panels: not abiding to the diameter and threshold shown.
- Don't crash when trying to save to XML with an unsaved image.
- Fix directional change edge feature analyzer. Also make the gamma letter used in this feature name appear properly in the results table.
- Prevent error when the fade track range is out of bounds.
- Fix remanent ROI in settings.
TrackMate v7.1.0: Bugfixes and grapher update.

This new minor version of TrackMate mainly brings bugfixes that were reported after the big update of this summer and several improvements on the grapher framework of TrackMate.
Grapher improvements.
Skip links in plots.
At the bottom of the grapher panel, there is now a connect check-box that allows specifying whether dots in the graph with be connected as in the tracks. By default, two dots in the plots are connected if they originate from two objects (spots or edges) that are connected in the tracks.
The lines connecting dots can now be removed by unchecking this box. This results in clearer graph generated faster when dealing with large amount of tracks.
TrackMate-GrapherConnectPoints.mp4
Plots are in sync with selection and display settings.
The plots now immediately updates when you change the selection or the display settings.
Untitled.mp4
Bufixes.
- Fix a bug causing the features not to be computed when using manual tracking or semi-automated tracking.
- Fix a bug when exporting tables to CSV: The numerical values were enclosed in useless quotation marks.
- Fix a bug with the semi-automatic tracker happening for 5D images.
TrackMate-BugSemiAutoTrackingFeatures.mp4
Minor improvements.
- Initialize TrackMate with the num of threads sets in IJ preferences.
TrackMate v7: Using and integrating DL & ML segmentation algorithms.

This release is the first one of the version 7 series of TrackMate. It includes major changes, that affects TrackMate capabilities, changes in the UI, the data model, and API. It follows an almost complete rewrite of TrackMate, that started with the first covid-19 induced lockdown.
We list here the major changes that affect users and developers that depend on TrackMate for their projects.
Usage and capabilities improvements.
Object contours in 2D.
TrackMate can now store, display, save, load and exploit object contours in 2D.
- The object contours are displayed in the main view,
- they are saved and loaded from the TrackMate XML file,
- they are used to compute spot numerical features such as intensity and shape descriptor (see below).
This new spot contour feature is fully compatible with the existing spot representation. A detector that does not return an object contour will generate spots as the same way as before (small circle or sphere of a fixed radius), and will be treated as before.
Limitations:
- Object contours are only supported for 2D images.
- An object contour has to be a simple polygon. That is: a unique polygon without hole or self-intersection. Holes and objects that are split over disconnected regions are not supported.
- There is yet not a tool to edit the polygon of a spot.
New builtin detectors that generate object contours.
Now that we can store object contours, we need detectors that can generate such contours. There 3 new builtin detectors in TrackMate that implement classic segmentation approaches:

The mask detector.
The mask detector creates objects from a black and white channel in the source image. You can add the mask as an extra channel in the source image. The objects will be built based on all the pixels have a value strictly larger than 0, which solves the issue of having a mask on 8-bit, 16-bit or 32-bit images.
It is documented here.
The threshold detector.
The threshold detector creates objects from a grayscale image (it can be one channel in a multi-channel image). You have to specify a threshold value to segment the objects.
It is documented here.
The label image detector.
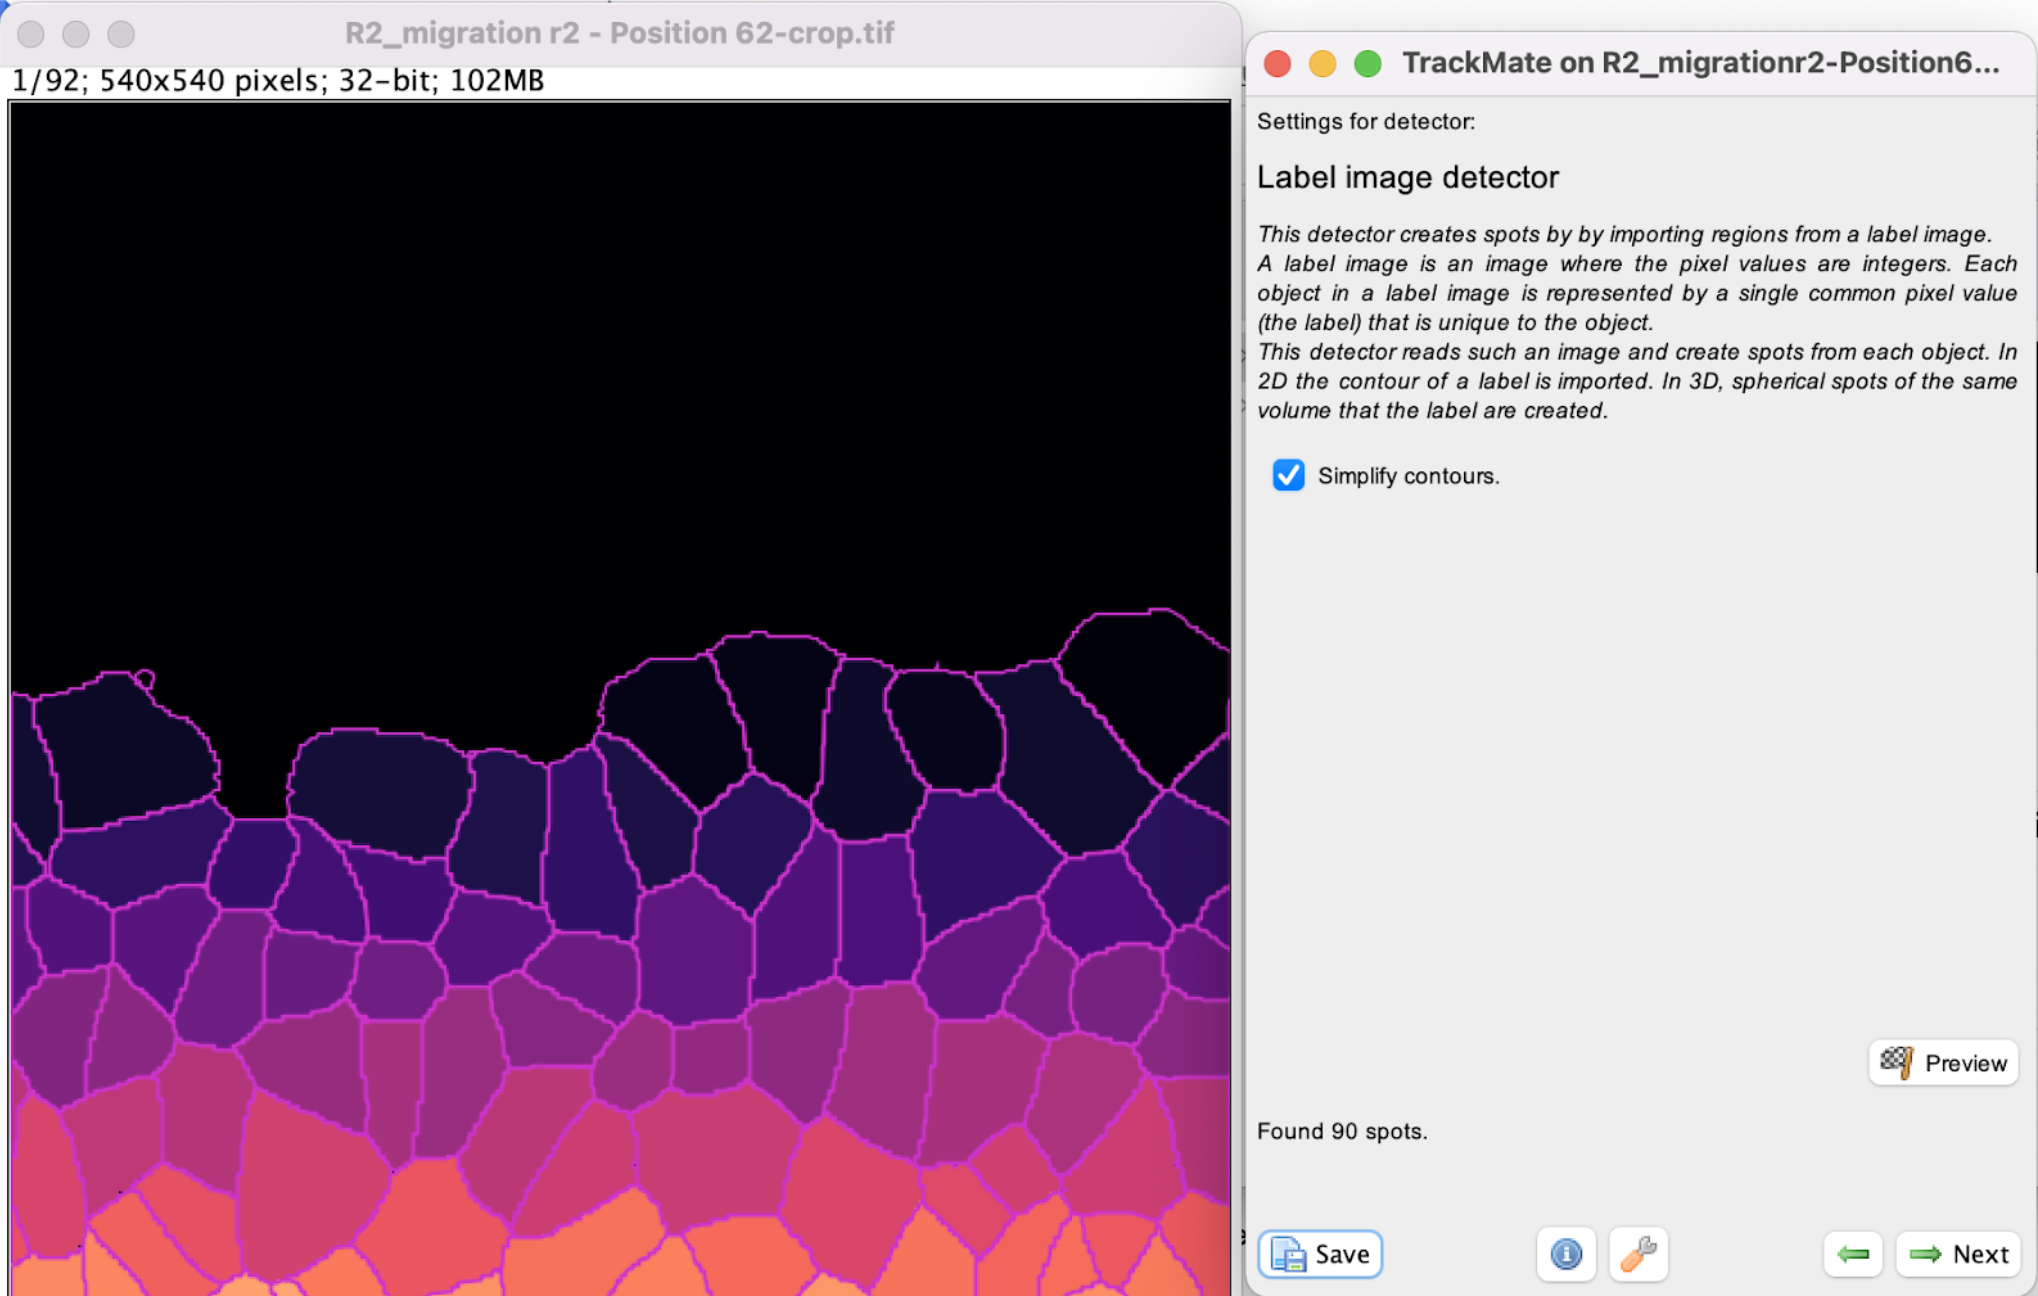
Label images are especially convenient as an output of segmentation algorithms. Indeed, in some cases you might have different objects that are so close that they touch each other. If a segmentation algorithm can detect them, but outputs a black and white mask, they will appear as one object in the mask if they share a border. In a label image, each object is represented by different integer values. For instance, the object #1 in a label image will be made from all the pixels that have a pixel value of 1, over a black background of 0. Object #2 will have the pixel value 2, etc. This allows resolving them even if they touch each other. This detector is also part of the core of TrackMate. It is documented here.
New detectors integrating major segmentation algorithms, in Deep-Learning, Machine-Learning and Morphology.
An important goal of the changes introduced in this release is to foster the integration of TrackMate with the major segmentation algorithms in our field. So we integrated 4 of them in TrackMate, coming from Deep-Learning, Machine-Learning and Morphology.
The StarDist TrackMate detector.

This detector requires that you subscribe to the CSBDeep and StarDist update sites from Fiji. It offers two new detectors that integrate StarDist in TrackMate, one using the versatile fluorescent nuclei model, and one for custom models.
It is documented here.
The ilastik TrackMate detector.
This detector allows for using an ilastik pixel classifier saved in an ilastik project file to process a source image in TrackMate. You need to have ilastik installed on your computed, and in Fiji, to subscribe to the ilastik update site.
It is documented here.
The Weka TrackMate detector.
This detector relies on a Weka classifier, that you can train using the Trainable Weka Segmentation plugin.
It is documented here.

The MorphoLibJ TrackMate detector.
Finally, we integrated the excellent Morphological Segmentation plugin of the MorphoLibJ.
It is documented here.
New and reworked numerical feature analysis.
The changes above prompted for big changes in the numerical feature framework. Now that we have the object contour, we can compute morphological descriptors. We also retired seldom used features and integrated existing ones that were available only via an external download so far.
Object shape features are available.
The 7 new detectors listed above return the object contour in 2D. We can therefore exploit them to measure the object morphology. When these detectors are used on 2D images, the following new morphological features will be automatically computed:
- Area;
- Perimeter;
- Circularity;
- Solidity;
- Ellipse 2D fit (X0, Y0, minor axis, major axis, angle and aspect ratio).
These new features are documented here.


Intensity measurements are made on all channels.
Before this release, a TrackMate user had to rely on a 3rd party extension to access the intensity measurements in all the channels of a multi-channel image (by Benoit Lombardo). Now multi-channel measurements are integrated in TrackMate, transparently for the user.
Intensity measurements reports the:
- mean
- max
- min
- median
- sum
- and standard deviation
of the intensity for all channels of the source image. When object contours are available, they are used for intensity measurements as well.
This is also the case for the Spot SNR and contrast features.
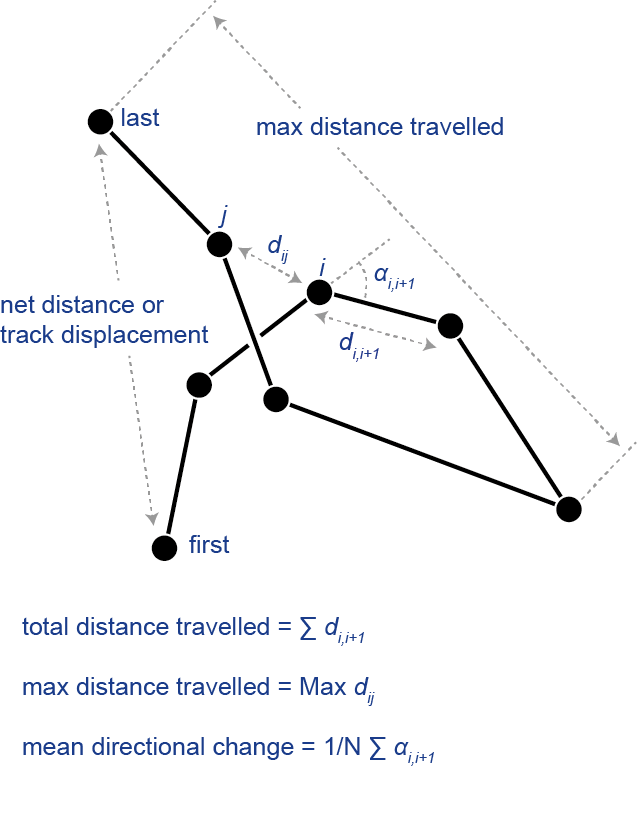
New track features: track motility features.
A TrackMate extension provided several track features useful in motility analysis. They are now integrated into TrackMate natively. They are documented here.
Some features have been renamed for clarity.
- Edges
- "Velocity" -> "Speed".
- Tracks
- "Gaps" -> "Number of gaps"
- "N spots" -> "Track N spots"
- "Complex points" -> "Number of complex points"
- "Duration of track" -> "Track duration"
- "X location (mean)" -> "Track mean X". The same for Y and Z.
New tracker: the overlap tracker.
TrackMate has a new tracker that best exploits the fact that object can now have contour: the overlap tracker.
Its usage is best explained with a drawing:

The new display settings system.
We rewrote entirely and extended the display settings in TrackMate.
They are many more display options for you to fine tune, and they are configured in a separate panel.
The new options are documented here.

Common display settings editor.
A new plugin entry lets you configure the defaults that will be used in future tracking session. You can find it in in Edit › Options › Configure TrackMate display settings…
Settings are saved with the data.
When you save a TrackMate session to XML, the save file will include the display settings you configured. When you will reload the data, the display settings will also be loaded and used.
New table views.
We reworked entirely the data tables that can be generated in the view panel.
There are now two new buttons, next to the TrackMate scheme button, that generate data table for the tracks.

The first one - Tracks - will show generate a table only for the objects that belong to tracks. The data is split in 3 tables, one for spots, one for links, and one for tracks. This table is empty when you have spots but no tracks (e.g. when you have only one ...
New action to export tracking results to a label image.
This release adds a new action that can export the tracking data to a label image.
A new 16-bit image is generated, of same dimension and size that of the input image. The label image has one channel, with black background (0 value) everywhere, except where there are spots. Each spot is painted with a uniform integer value equal to the trackID it belongs to.
Spots that do not belong to tracks are painted with a unique integer larger than the last trackID in the dataset.

An option panel is proposed to the user:

- If
Export spots as dotsi selected, spots will be painted as single dots instead of ellipsoids. - If
Export only spots in tracksis selected, only the spots belonging to visible tracks will be painted. Otherwise, spots not belonging to a track will be painted with a unique ID, different from the track IDs and different for each spot.


The action can be called from a script. For instance in Jython:
from fiji.plugin.trackmate import Model
from fiji.plugin.trackmate import Settings
from fiji.plugin.trackmate import TrackMate
from fiji.plugin.trackmate import SelectionModel
from fiji.plugin.trackmate import Logger
from fiji.plugin.trackmate.detection import LogDetectorFactory
from fiji.plugin.trackmate.tracking.sparselap import SparseLAPTrackerFactory
from fiji.plugin.trackmate.tracking import LAPUtils
from ij import IJ
import fiji.plugin.trackmate.visualization.hyperstack.HyperStackDisplayer as HyperStackDisplayer
import fiji.plugin.trackmate.features.FeatureFilter as FeatureFilter
import sys
import fiji.plugin.trackmate.features.track.TrackDurationAnalyzer as TrackDurationAnalyzer
from  fiji.plugin.trackmate.action import LabelImgExporter

imp = IJ.openImage('http://fiji.sc/samples/FakeTracks.tif')
imp.show()

model = Model()
settings = Settings()
settings.setFrom(imp)
settings.detectorFactory = LogDetectorFactory()
settings.detectorSettings = {
    'DO_SUBPIXEL_LOCALIZATION' : True,
    'RADIUS' : 2.5,
    'TARGET_CHANNEL' : 1,
    'THRESHOLD' : 0.,
    'DO_MEDIAN_FILTERING' : False,
}
filter1 = FeatureFilter('QUALITY', 30, True)
settings.addSpotFilter(filter1)
settings.trackerFactory = SparseLAPTrackerFactory()
settings.trackerSettings = LAPUtils.getDefaultLAPSettingsMap() # almost good enough
settings.trackerSettings['ALLOW_TRACK_SPLITTING'] = True
settings.trackerSettings['ALLOW_TRACK_MERGING'] = True
settings.addTrackAnalyzer(TrackDurationAnalyzer())
filter2 = FeatureFilter('TRACK_DISPLACEMENT', 10, True)
settings.addTrackFilter(filter2)
trackmate = TrackMate(model, settings)

ok = trackmate.checkInput()
if not ok:
    sys.exit(str(trackmate.getErrorMessage()))

ok = trackmate.process()
if not ok:
    sys.exit(str(trackmate.getErrorMessage()))

selectionModel = SelectionModel(model)
displayer =  HyperStackDisplayer(model, selectionModel, imp)
displayer.render()
displayer.refresh()

exportSpotsAsDots = False
exportTracksOnly = False
lblImg = LabelImgExporter.createLabelImagePlus( trackmate, exportSpotsAsDots, exportTracksOnly )
lblImg.show()
This work was commissioned by Sébastien Tosi, so that TrackMate can be used and tested on the Biaflows platform.
BIAFLOWS helps comparing bio image analysis workflows by benchmarking them on annotated datasets and simplifying their reproducible deployment.
Check this: https://biaflows.neubias.org/