These instructions will guide you through the installation of the necessary software for this course. This includes:
- VMware, a virtualization software to install an operating system without disrupting your current system
- Debian Linux, a unix-like operating system
- ROS, a very popular robotics toolkit
- The Racecar simulator
You can install this software via a prebuilt virtual machine (fast and easy), or manually (more control and more work).
The TAs will come around with flash drives containing VMware installers for Windows and MacOS as well as the latest racecar virtual machine image.
Alternatively, you can obtain VMware for free through IS&T. If you already have VirtualBox installed, feel free to use it instead of VMware.
Import .ova file into VMware (or VirtualBox) and then boot the machine. Log in to the racecar account with password racecar@mit. Everything is already installed! Skip ahead to the
Testing the Racecar Simulator section.
For virtualization software to work, you will need to have hardware virtualization support (Intel VT-x or AMD-V) enabled in your BIOS.
On MacOS Catalina, you might encounter mouse issues. This seems to be related to the MacOS Accessibility settings, and you might find this link helpful.
We recommend that you install the operating system you will use for this course as a virtual machine. This will isolate the system from your native operating system and can be much easier for you and the TAs to debug if things go wrong. Plus, virtual machines can be paused in a particular state and backed up easily.
While it is entirely possible to install ROS and the other software directly on your own native operating system, this is done at your own risk. If you know what you're doing, everything will probably work fine if you are running Debian or Ubuntu. Other distributions (Arch Linux, Gentoo, OS X, NixOS) are not as well supported by ROS and you may find yourself having to manually build packages or even write fixes for the code.
If you are already running either Debian 9 or Ubuntu 18.04 you can skip ahead to the Installing ROS section.
Download and install VMware, which you can get for free through IS&T.
Download the Debian 9 operating system. Choose the small, amd64 installer. (It is important to choose Debian 9, instead of 10, since ROS is not supported on Debian 10).
Open VMWare and select File > New Virtual Machine.... Select a "Typical" installation. When promted, select the .iso Debian image you downloaded. It will automatically select the correct distribution. Give the VM a nice name and use the default disk settings. In the final page, we reccomend you click the "Customize Hardware" button and increase the memory to at least 2GB - make sure your computer has enough memory to do this. Hit finish and the OS should boot.
In the boot menu choose the "Graphical Installer" option and begin selecting the default options. When promted, set your hostname to racecar-vm, leave the domain name blank. Set the username to racecar and choose a memorable password for the root and user. Continue selecting default settings. When asked about writing to disks select "yes". When asked about setting up GRUB select "yes" then select /dev/sda.
You should now have Debian installed! Log in and click the "Activities" button in the top left and open the "Terminal" application. Type su and enter your password. Now run the following to install some essential software:
sudo apt-get update
sudo apt-get upgrade
sudo apt-get install sudo open-vm-tools open-vm-tools-desktop vim git dirmngr make g++
After the installation completes run visudo and add the following line to the file that opens up:
racecar ALL=(ALL:ALL) ALL
Write out the file and type exit in the terminal, then shut the virtual machine down.
- Use CTRL+SHIFT+V to paste into the VM.
- Use CTRL+ALT to release your keyboard from the VM.
- Select
View > Autosize > Autofit Guestto have the VM automatically resize to the window size.
Boot up the virtual machine and log in. Follow the instructions on the ROS wiki to add the ROS sources and keys, then run:
sudo apt-get install ros-melodic-desktop
A catkin workspace is where all of your ROS code will live. The workspace will automatically keep track of the packages scripts you write so you can reference them in other pieces of code. Create it by running:
source /opt/ros/melodic/setup.bash
mkdir -p ~/racecar_ws/src
cd ~/racecar_ws/
catkin_make
Then add the following to your ~/.bashrc file:
source ~/racecar_ws/devel/setup.bash
The ~/.bashrc file is run anytime you open up a new terminal. By adding that line you are defining a number of ROS variables in every terminal you open.
First install some additional ros packages by running:
sudo apt-get install ros-melodic-tf2-geometry-msgs ros-melodic-ackermann-msgs ros-melodic-joy ros-melodic-map-server
Then navigate to your catkin workspace source folder and use git to clone the simulator:
cd ~/racecar_ws/src
git clone https://github.com/mit-racecar/racecar_simulator.git
Then run catkin_make in the root of your catkin workspace to build it.
cd ~/racecar_ws
catkin_make
source devel/setup.bash
Start a roscore which acts as the communication center for all ROS services. Just run this in a terminal:
roscore
In another terminal start a graphical utility called rviz by running:
rviz
In another terminal start the simulator itself by running
roslaunch racecar_simulator simulate.launch
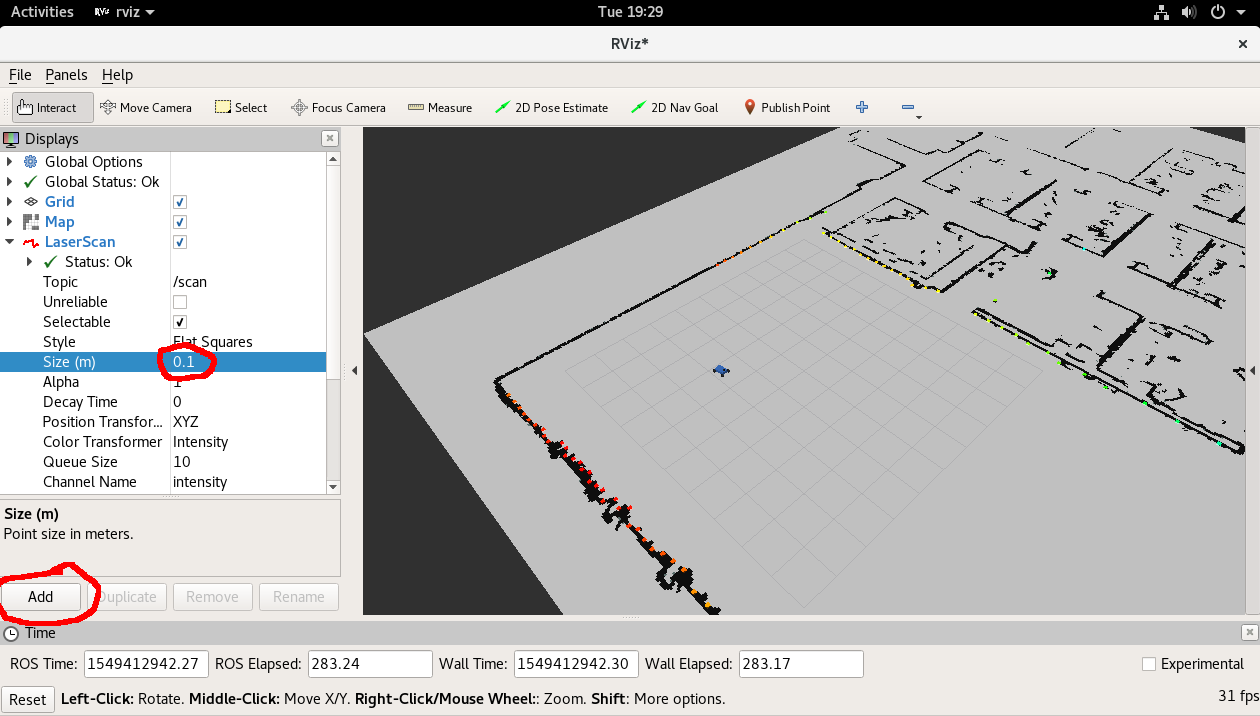
Now in the rviz window that opened, in the left panel at the bottom click the "Add" button, then in the "By topic" tab add the /map topic and the /scan topic.
Then in the "By display type" tab add the RobotModel type.
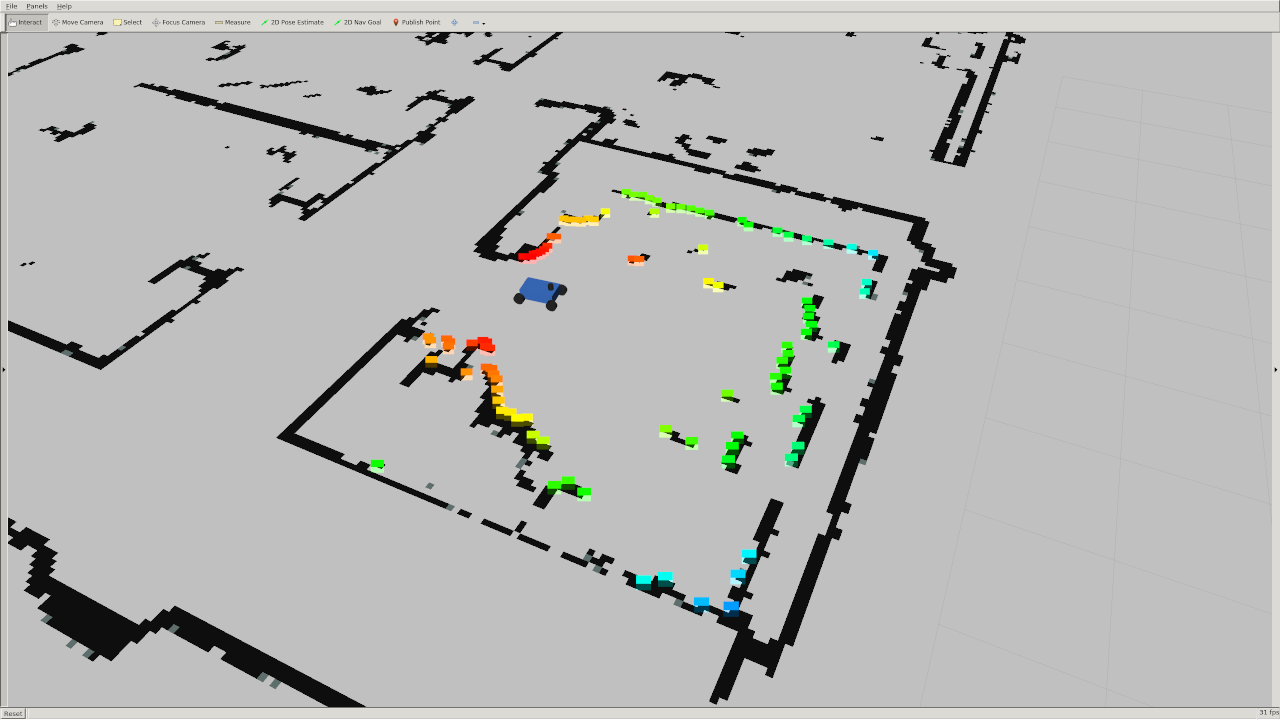
In the left panel under the newly added LaserScan section, change the size to 0.1 meters for a clearer visualization of the lidar (shown in rainbow).
You should see the car sitting in the middle of a 2D map of MIT's building 31 as shown below:
You can move the car around by clicking the "2D Pose Estimate button" on the top of the screen and dragging your mouse on the desired pose.

