Set up online workshops regarding Data Sciences tools focused on the Earth Sciences for TACC Hackathons. These modules are currently deployed at site
This project is an open project, and contributions are welcome from any individual. All contributors to this project are bound by a code of conduct. Please review and follow this code of conduct as part of your contribution.
Issues and bug reports are always welcome. Code clean-up, and feature additions can be done through Pull Requests via branches.
Any official communication for this project will be done using Github Issues.
All products are licensed under an MIT License unless otherwise noted.
This course is based on Ines Montani's Spacy course.
Quickstart instructions can be found here
Recommended installing instructions are as follow.
If you would like to create your website using this repository as a base.
Instructions taken from Course Starter
Mac instructions
- Make sure that you have Homebrew installed in order to download Node
The most important part of this installation is making sure that you are running some version of 10
- Check if you have Node installed already by using the command :
node --version
If that produces an error then you can simply download version 10 with the following command:
brew install node@10
If it’s a version other than 10, you will need to downgrade/upgrade to version 10 - or Gatsby will not be able to start a development server or build a page.
To change to version 10, follow the following commands:
brew search node
This will give you an output similar to this:
==> Formulae
libbitcoin-node   node-build     node@12       nodeenv
llnode       node-sass      node_exporter    nodenv
node ✓       node@10       nodebrew
Next, you will want to install version 10 with the command:
brew install node@10if the checkmark is currently on node we then unlink node from its current version first using:
brew unlink node
Then, link version 10 that was just installed:
brew link node@10
You may also be prompted to specify that you need to have node@10 first in your PATH so you should run the command below before attempting force linking node@10 (the command above) again:
echo 'export PATH="/usr/local/opt/node@10/bin:$PATH"' >> ~/.bash_profile
Sometimes, linking to node@10 will need to be forced and thus will require:
brew link --force --overwrite node@10
Next check again what version you are running to confirm that it is a version of 10. there is a possibility that an error will be produced so you can either permanently set your
node --version
this should output the following:
v10.24.1
Now that we have this done, Gatsby’s installation and building process should be much easier.
Install Gatsby
This should a single command to complete this and will install Gatsby globally on your computer.
npm install -g gatsby-cli
Warning: Do not update your dependencies here.
-
Fork the repository. Then clone it locally.
-
On your terminal, locate yourself to the root of the repo.
-
In order to run on local server, we must install all relevant dependencies by running the following:
npm install
Warning: You will be prompted to run "npm audit fix" to fix them. I do not recommend doing this as it may burn your site down.
During the build, you might see several ESLint errors. We are trying to fix them. However, the output below will still build your course:
found 572 vulnerabilities (4 low, 4 moderate, 564 high)
- Finally, to build the site on your local:
npm run dev
Delivering this as an output (copy and paste this address into any browser) :
You can now view ec_workshops_py in the browser.

  http://localhost:8000/
Quick link: http://localhost:8000/
This should be the beginning of a functioning starter-course!
Now that you have a website that is deploying on your local server, we can now begin the steps to customize it to your own taste.
Get familiarized with the following repository architecture as you will need to work with some of the files pointed out here to do your customizations.
ec_workshops_py
├── .gitignore          # Files you change on your local that you do not want to commit to the repo.
├── LICENSE             # Terms able to use this platform
├── README.md           # Documentation and Description
├── gatsby-browser.js
├── gatsby-config.js
├── gatsby-node.js
├── meta.json           # * Add bio descriptions and branch needed to make binder from
├── package-lock.json
├── package.json        # * Customizable regarding your application
├── theme.sass          # * Customize fonts style and size and website colours
│   │
├── binder
|   └── requirementse.txt  # * File to install required dependencies needed
│   │
├── chapters            # Customizable Modules
|   ├── chapter1.md
|   ├── ...
|   └── chapter7.md
│   │
├── exercises           # This file will contain all the coding exercise scripts.
|   ├── exercise_01.py
|   └── solution_01.py
│   │
├── data                # Store exercise datafiles here
    └── exercise-data.csv
├── slides              # This is where the slide decks are
|   ├── module0_00.md
|   ├── ...
|   └── moduleN_nn.md
│   │
├── src                 # Don't want to go too much into this
|   ├── markdown.js
|   ├── context.js
|   ├── components
|   |   ├── button.js
|   |   ├── choice.js
|   |   ├── code.js
|   |   ├── exercise.js
|   |   ├── hint.js
|   |   ├── juniper.js
|   |   ├── layout.js
|   |   ├── link.js
|   |   ├── seo.js
|   |   ├── slides.js
|   |   └── typography.js
|   |   |
|   ├── pages
|   |   └── index.js
|   |   |
|   ├── styles
|   |   ├── button.module.sass
|   |   ├── choice.module.sass
|   |   ├── code.module.sass
|   |   ├── exercise.module.sass
|   |   ├── hint.module.sass
|   |   ├── index.module.sass
|   |   ├── index.sass
|   |   ├── layout.module.sass
|   |   ├── link.module.sass
|   |   ├── reveal.css
|   |   ├── slides.module.sass
|   |   └── typography.module.sass
|   |   |
|   └── templates
|   |   └── chapter.js
|   |   |
└── static               # Media files for bio and main page.
    ├── icon.png
    ├── icon_check.svg
    ├── icon_slides.svg
    ├── logo.svg
    ├── profile.jpg
    └── social.jpg
The following points of customization are available:
| Location | Description |
|---|---|
meta.json |
General config settings, title, description etc. |
theme.sass |
Color theme. |
binder/requirements.txt |
Python requirements to install. |
chapters |
The chapters, one Markdown file per chapter. |
slides |
The slides, one Markdown file per slide deck. |
static |
Static assets like images, will be copied to the root. |
| Setting | Description |
|---|---|
courseId |
Unique ID of the course. |
title |
The title of the course. |
slogan |
Course slogan, displayed in the page title on the front page. |
description |
Course description. Used for footer. |
bio |
Author bio. Used in the footer. |
siteUrl |
URL of the deployed site (without trailing slash). |
twitter |
Author twitter handle, used in Twitter cards meta. |
fonts |
Google Fonts to load. Should be the font part of the URL in the embed string, e.g. Lato:400,400i,700,700i. |
juniper.repo |
Repo to build on Binder in user/repo format. Usually the same as this repo. |
juniper.branch |
Branch to build. Ideally not master, so the image is not rebuilt every time you push. |
juniper.lang |
Code language for syntax highlighting. |
juniper.kernelType |
The name of the kernel to use. Currently, python |
juniper.debug |
Logs additional debugging info to the console. |
showProfileImage |
Whether to show the profile image in the footer. If true, a file static/profile.jpg needs to be available. |
footerLinks |
List of objects with "text" and "url" to display as links in the footer. |
All files added to /static will become available at the root of the deployed
site. So /static/image.jpg can be referenced in your course as /image.jpg.
The following assets need to be available and can be customized:
| File | Description |
|---|---|
icon.png |
Custom favicon. |
logo.svg |
The course logo. |
profile.jpg |
Photo or profile image. |
social.jpg |
Social image, displayed in Twitter and Facebook cards. |
icon_check.svg |
"Check" icon displayed on "Mark as completed" button. |
icon_slides.svg |
Icon displayed in the corner of a slides exercise. |
Navigate to index.js and modify the text in <Layout isHome> to match your Hackathon / course goal.
Chapters are placed in /chapters and are Markdown files
consisting of <exercise> components. They'll be turned into pages, e.g.
/chapter1. In their frontmatter block at the top of the file, they need to
specify type: chapter, as well as the following meta:
---
title: The chapter title
description: The chapter description
prev: /chapter1 # exact path to previous chapter or null to not show a link
next: /chapter3 # exact path to next chapter or null to not show a link
id: 2 # unique identifier for chapter
type: chapter # important: this creates a standalone page from the chapter
---
Slides are placed in /slides and are markdown files consisting of
slide content, separated by ---. They need to specify the following
frontmatter block at the top of the file:
---
type: slides
---
The first and last slide use a special layout and will display the headline
in the center of the slide. Speaker notes (in this case, the script) can be
added at the end of a slide, prefixed by Notes:. They'll then be shown on the
right next to the slides. Here's an example slides file:
---
type: slides
---

# Processing pipelines

Notes: This is a slide deck about processing pipelines.

---

# Next slide

- Some bullet points here
- And another bullet point

<img src="/image.jpg" alt="An image located in /static" />When using custom elements, make sure to place a newline between the opening/closing tags and the children. Otherwise, Markdown content may not render correctly.
Container of a single exercise.
| Argument | Type | Description |
|---|---|---|
id |
number / string | Unique exercise ID within chapter. |
title |
string | Exercise title. |
type |
string | Optional type. "slides" makes container wider and adds icon. |
| children | - | The contents of the exercise. |
<exercise id="1" title="Introduction to Jupyter Notebooks">

Content goes here...

</exercise>| Argument | Type | Description |
|---|---|---|
id |
number / string | Unique identifier of the code exercise. |
source |
string | Name of the source file (without file extension). Defaults to exc_${id} if not set. |
solution |
string | Name of the solution file (without file extension). Defaults to solution_${id} if not set. |
test |
string | Name of the test file (without file extension). Defaults to test_${id} if not set. |
| children | string | Optional hints displayed when the user clicks "Show hints". |
<codeblock id="02_03">

This is a hint!

</codeblock>Container to display slides interactively using Reveal.js and a Markdown file.
| Argument | Type | Description |
|---|---|---|
source |
string | Name of slides file (without file extension). |
<slides source="chapter1_01_introduction-to-python">
</slides>Container for multiple-choice question.
| Argument | Type | Description |
|---|---|---|
id |
string / number | Optional unique ID. Can be used if more than one choice question is present in one exercise. |
| children | nodes | Only <opt> components for the options. |
<choice>

<opt text="Option one">You have selected option one! This is not good.</opt>
<opt text="Option two" correct="true">Yay! </opt>

</choice>A multiple-choice option.
| Argument | Type | Description |
|---|---|---|
text |
string | The option text to be displayed. Supports inline HTML. |
correct |
string | "true" if the option is the correct answer. |
| children | string | The text to be displayed if the option is selected (explaining why it's correct or incorrect). |
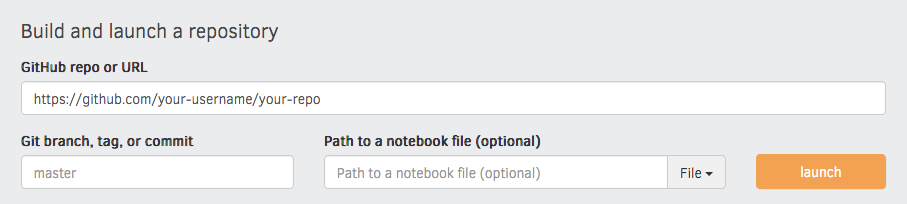
The requirements.txt in the repository defines the
packages that are installed when building it with Binder. You can specify the
binder settings like repo, branch and kernel type in the "juniper" section of
the meta.json. I'd recommend running the very first build via the interface on
the Binder website, as this gives you a detailed build
log and feedback on whether everything worked as expected. Enter your repository
URL, click "launch" and wait for it to install the dependencies and build the
image.
If you want to use a different binder hub, you need to go to juniper.js in the repository and change the field in static - > url
This project is developed using Binder, Gatsby and md files.
It runs on a MacOS system.
This project will teach about DS tools that can be helpful for ES research.