StressAnAPI is a Pure Python application for stress testing on APIs. Easily configurable via command line. Use the arrow keys to increase speed and bursts, see results, requests per seconds and much more.

pip install stressanapi
A script file will be installed in /usr/local/bin/stressanapi and you can run the application from any path just typing stressanapi.
StressAnAPI is Pure Python, so it will not install any libraries on your system. The entire source (1 single file) will be placed in /usr/local/lib/python3.XX/dist-packages/stressanapi
The configuration file is based on the json format and requires a minimum of 2 keys, the "url" and the "method". It's the basics for you to start testing your API.
{
    "url":"http://127.0.0.1:8000/api/v1/foo_action",
    "method":"GET"
}
The json file is not like a Python dictionary, it is similar, but it requires double quotes in the names of keys and values, it does not accept extra commas, and the first line must have only a curly bracket '{', and the last line must have only the closing of the initial curly bracket '}'. When in doubt, create the configuration file in Visual Studio Code, and the syntax highlight will show you if there are errors.
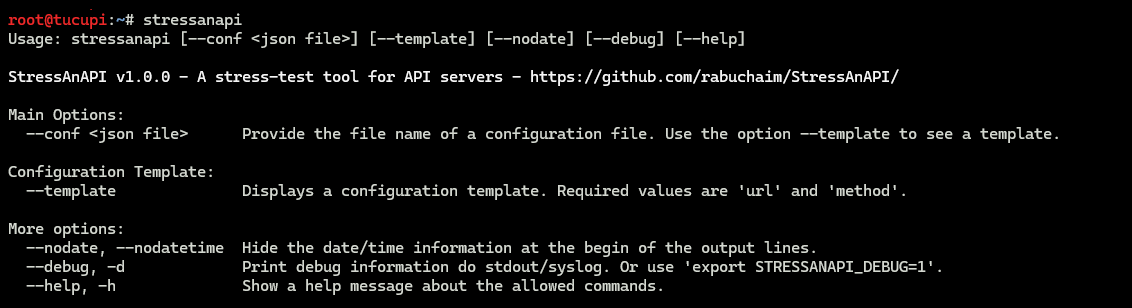
There are more options that can be configured, to see them just use the --template command. This option already shows a valid json file, just change it according to your needs and/or remove what you don't want to customize.
# stressanapi --template{
"url": "http://localhost:8000/api/v1/foo_action",
"method": "GET|POST|PUT|PATCH|DELETE",
"post_data": {
"id": "my_customer_id",
"name": "spécial_çhärs",
"token": "mysupertoken"
},
"headers": {
"User-Agent": "StressAnAPI v1.0.3",
"Host": "set_your_api_hostname_here",
"Content-Type": "application/json",
"X-Forwarded-For": "1.2.3.4",
"X-Forwarded-Host": "1.2.3.4",
"X-Real-IP": "1.2.3.4"
},
"timeout": 1,
"success_status_codes": [
200,
201,
202,
204
],
"user_agent": "StressAnAPI v1.0.3",
"start_interval": 0.5,
"start_burst": 1,
"start_threads": 1,
"cpu_affinity": [-1],
"syslog_server_url":"udp://127.0.0.1:514/local7"
}
-
url: This value can accept template variables:- %%randomipv4%% to be replaced by a random IPv4
- %%randomipv6%% to be replaced by a random IPv6
- %%randomprivateipv4%% to be replaced by a random Private IPv4
- %%randomint:val_min:val_max%% to be replaced by a random integer between 'val_min' and 'val_max'
Example:
-
method: Enter the method you want to test within the available GET, POST, PUT, PATCH and DELETE -
post_data: These are the values you want to post to the API. In this version, only key and value will be accepted. If you inform the GET method, these post_data values will be ignored and will not be sent in API requests. -
headers: Enter the headers you want to send to your API. Thecontent-typeis an important header. Headers are sent in any method. -
timeout: Enter the timeout you want to work. The application does not make retries. You can increase/decrease the timeout using the + and - keys on your keyboard to test an ideal and safe timeout value to configure on your API proxy server. -
success_status_codes: Enter the status_codes that you consider "success" to return from your API for the call you configured. This information is important in generating statistics, where only the methods reported here are considered successful. If you omit this field, by default, status codes 200, 201, 202 and 204 will be considered successful. -
user_agent: If this field is omitted, the default user-agent "StressAnAPI v1.0.3" will be used. -
start_interval: Enter the interval between one request and another. This is necessary to allow you to increase/decrease the speed of requests and evaluate how your API behaves with an increase in requests and their impacts. By default, there is a 1 second interval between each request. You can decrease/increase this interval anytime using the UP and DOWN keys on your keyboard. -
start_burst: Burst is the number of requests before an interval. You can increase and decrease the burst using the RIGHT and LEFT keys on your keyboard. By default, the application makes 1 request + interval. You can increase it to 2 requests + interval, 10 requests + interval, and so on... -
start_threads: This value simulates user concurrency in your API. Use with caution. You can increase/decrease the number of threads using the < and > keys on your keyboard. -
cpu_affinity: This is a very important option. If you omit this value, Python will use any processor and you will have concurrency in the stress test. To test the best performance of your API together with StressAnAPI, I suggest defining a CPU core to be used here. If you set the value '-1', the application will inform the Linux operating system to isolate the stressanapi.py process on the last available processor. Do a test without using this option, and then using this option, you will see that it is possible to obtain more requests if you isolate stressanapi on a single CPU core. The same thing with the API server, always leave it isolated in a core all to itself and performance will be much higher. Isolate the affinity of this process and let the operating system take care of the other processes. You can use the psutil library in your application to do this. Here, we are using thetaskset -cp [core_index] [pid]command to stay pure Python. You can also enter more than 1 CPU Core, just enter this value as a list of integers. Ex:[0,1]and it will use the 1st and 2nd cpu core available on your machine. -
syslog_server_url: NEW! Configure the address of your syslog server here to send request results, including the content of the responses. Supports "udp://ipaddr:port/facility", "tcp://ipaddr:port/facility" or "/dev/log". When sending to syslog you have a loss in StressAnAPI performance, but in some cases it is necessary for debugging, so this option is available. Use only if necessary. Give preference to the UDP protocol to minimize performance loss.
Once the configuration file is prepared, run stressanapi by calling this file with the --conf option:
# stressanapi --conf myconf.json
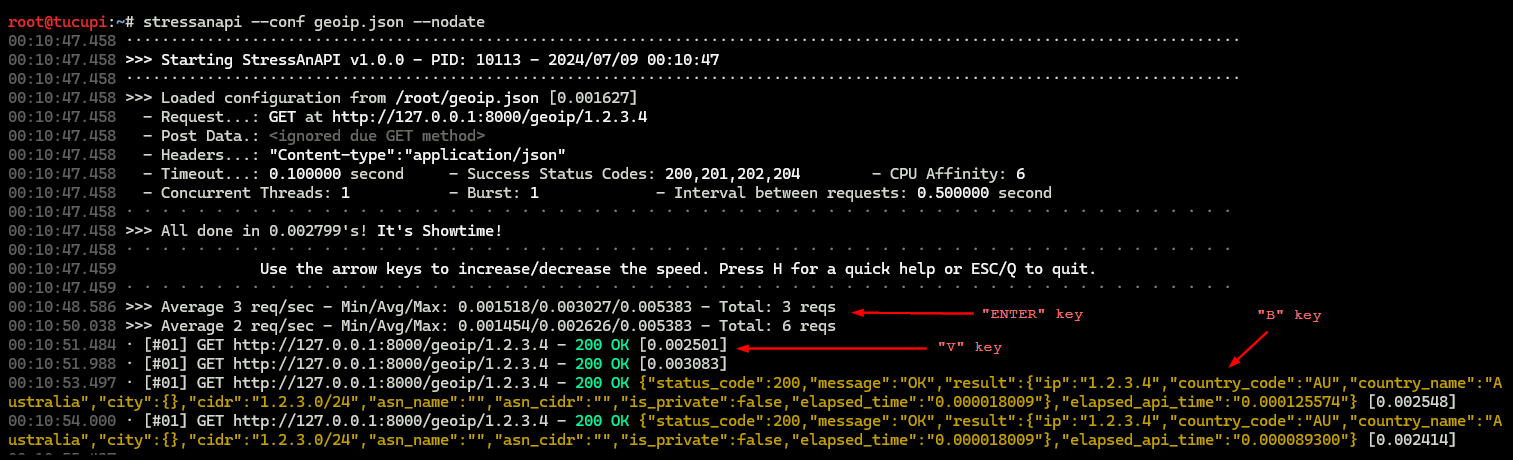
At this moment, a call is already being made every 0.5 seconds (which was defined in my example configuration file). To see how many requests per second are being made, press the ENTER key. To view the requests, press the V key on your keyboard. To see the response of your call, press the B key on your keyboard. Press V or B again to stop to see this information.
Press the H key to view available control options.

You can decrease the interval, increase the burst and even increase the number of threads to test the limits of your API. From time to time you can press V or B to view returning calls. And press the ENTER key to see the number of requests per second that are currently being made and press the S key to access the statistics of all requests that have already been made. If necessary, you can pause the process pressing the P key.
The control is very intuitive and you can even play with it.
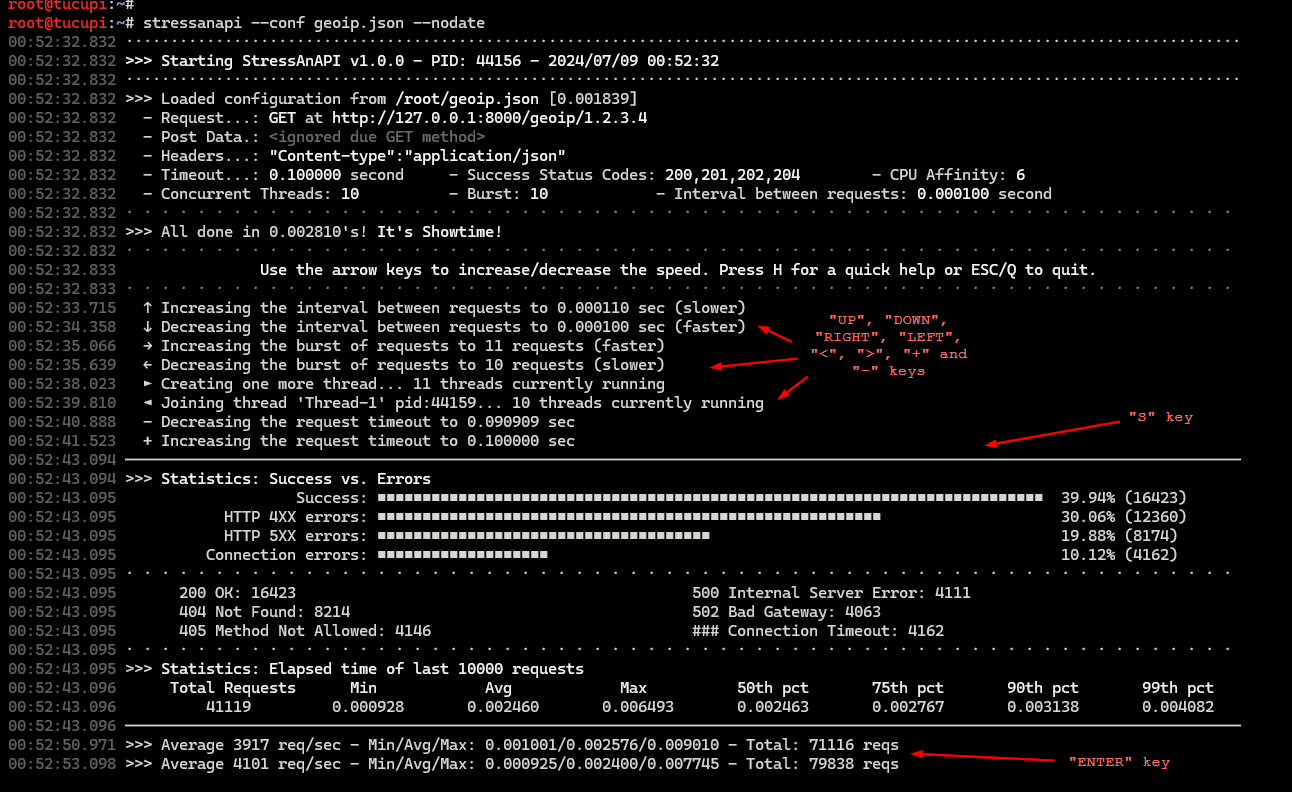
The last section of the statistics, which says "Statistics: Elapsed time", the last items 50th pct, 75th pct, 90th pct and 99th pct, mean that: 50% of requests are below 0.002436 seconds, and 75% of requests are below 0.002743 seconds, etc..
Along with the application, there is also an API server for testing made with Tornado. To use this test server, you need to install the Tornado library with pip install tornado and simply run simple_stressanapi_server. But that's only if you want to use our little server to test StressAnAPI. By default, this server binds to IP 127.0.0.1, port 8000 and accepts any method (GET, POST, PUT, PATCH and DELETE) from the API root http://localhost:8000/anything_you_want, and simply returns an "OK". You can change the --host and --port parameters, and you can even configure CPU affinity to isolate the server on a single processor.
# simple_stressanapi_server
To use the simple_stressanapi_server.py you need the 'tornado' library. Run: pip install tornado

# pip install tornado
Collecting tornado
Installing collected packages: tornado
Successfully installed tornado-6.4.1

# simple_stressanapi_server.py -h
usage: simple_stressanapi_server.py [-h] [--host <ip_address>] [--port <port_number>] [--cpu <cpu_index>] [--log]

>>> Simple StressAnAPI Server v1.0.3

options:
  -h, --help            show this help message and exit
  --host <ip_address>   enter the IP address to bind the server. Default: 127.0.0.1
  --port <port_number>  choose the port to listen on. Default: 8000
  --cpu <cpu_index>     choose a CPU core to isolate the process of this API server. Accepted values: from 0 until <your cpu count - 1>
  --log                 enable Tornado pretty logging

# simple_stressanapi_server.py
2024/07/08 23:57:10 >>> Tornado Server is listening on http://127.0.0.1:8000/
2024/07/08 23:57:10   > Run with --log to enable pretty_logging().
2024/07/08 23:57:15   > Average Requests: 975 per second
2024/07/08 23:57:20   > Average Requests: 1129 per second
2024/07/08 23:57:25   > Average Requests: 2655 per second
2024/07/08 23:57:30   > Average Requests: 3549 per second
(...)Join us in the Google Groups to receive notifications of new releases: https://groups.google.com/g/stressanapi
-
Possibility of reading files containing URL data, or even post_data and header fields. Something like: {"X-Forwarded-For": "random:ipv4"} where it will put a different randomic IPv4 for each request, or even {"name": "filerand:names.txt"}, where it will put the content of one of the lines names.txt file in the "name" field for each request << ON THE WAY
-
Use a CSV file with a sequence of URLs and methods to be called in sequence
Open an issue or e-mail me: ricardoabuchaim at gmail.com