This is an implementation of the ESPHome component to control HVAC on the base of the SmartAir2 and hOn Haier protocols (AC that is controlled by the hOn or SmartAir2 application).
There are two versions of the Haier protocol: the older version uses an application called SmartAir2 while the newer version uses an application called hOn. Both protocols are compatible on the transport level but utilize different commands to control appliances.
Older Haier models controlled by the SmartAir2 application are using the KZW-W002 module. This module can’t be reused, and you need to replace it with an ESP or RPI Pico W module. The USB connector on the board doesn’t support the USB protocol. It is a UART port that just uses a USB connector. To connect the ESP board to your AC you can cut a USB type A cable and connect wires to the climate connector.
| Board | USB | Wire color | ESP8266 |
|---|---|---|---|
| 5V | VCC | red | 5V |
| GND | GND | black | GND |
| TX | DATA+ | green | RX |
| RX | DATA- | white | TX |
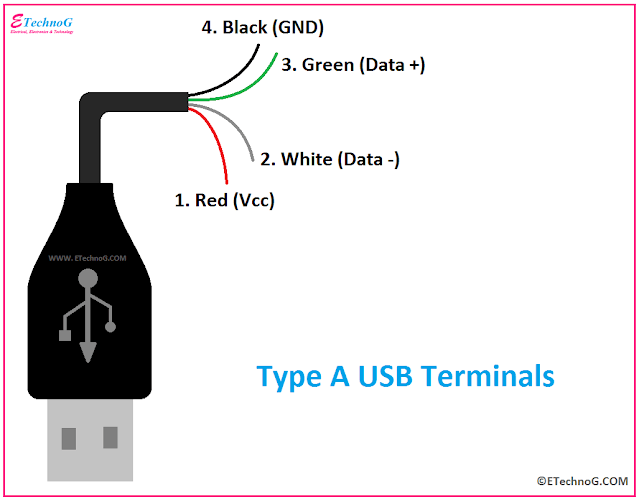
KZW-W002 module pinout
Newer Haier models using a module called ESP32-for-Haier. It is an ESP32 single-core board with an ESP32-S0WD chip. In some cases, you can reuse this module and flash it with ESPHome, but some new modules don’t support this. They look the same but have encryption enabled.
Warning! The new generation of ESP32-Haier devices has encryption enabled, so they can only be flashed with firmware that is signed with a private key. There is no way to make them work with ESPHome, so if you try to do it, the board will get into a boot loop with the error rst:0x10 (RTCWDT_RTC_RESET),boot:0x13 (SPI_FAST_FLASH_BOOT) The only way to recover this board is to flash it with the original image. So before starting your experiments make a backup image.

ESP32-for-Haier UART0 pinout
Also, you can use any other ESP32, ESP8266, or an RPI pico W board. In this case, you will need to cut the original wire or make a connector yourself (the board has a JST SM04B-GHS-TB connector)
This component requires a UART Bus to be setup.
# Example configuration entry
climate:
  - platform: haier
    id: haier_ac
    protocol: hOn
    name: Haier AC
    uart_id: ac_port
    wifi_signal: true
    beeper: true
    display: true
    visual:
      min_temperature: 16 °C
      max_temperature: 30 °C
      temperature_step: 1 °C
    supported_modes:
    - 'OFF'
    - HEAT_COOL
    - COOL
    - HEAT
    - DRY
    - FAN_ONLY
    supported_swing_modes:
    - 'OFF'
    - VERTICAL
    - HORIZONTAL
    - BOTH
  supported_presets:
    - AWAY
    - ECO
    - BOOST
    - SLEEP
  on_alarm_start:
    then:
      - logger.log:
          level: WARN
          format: "Alarm activated. Code: %d. Message: \"%s\""
          args: [ code, message]
  on_alarm_end:
    then:
      - logger.log:
          level: INFO
          format: "Alarm deactivated. Code: %d. Message: \"%s\""
          args: [ code, message]
  on_status_message:
    then:
      - logger.log:
          level: INFO
          format: "New status message received, size=%d, subcmd=%02X%02X"
args: [ 'data_size', 'data[0]', 'data[1]' ]- id (Optional, ID): Manually specify the ID used for code generation.
- uart_id (Optional, ID): ID of the UART port to communicate with AC.
- protocol (Optional, string): Defines communication protocol with AC. Possible values: hon or smartair2. The default value is smartair2.
- name (Required, string): The name of the climate device.
- wifi_signal (Optional, boolean): If true - send wifi signal level to AC.
- answer_timeout (Optional, Time): Responce timeout. The default value is 200ms.
- alternative_swing_control (Optional, boolean): (supported by smartAir2 only) If true - use alternative values to control swing mode. Use only if the original control method is not working for your AC.
- status_message_header_size (Optional, int): (supported only by hOn) Define the header size of the status message. Can be used to handle some protocol variations. Use only if you are sure what you are doing. The default value: 0.
- control_packet_size (Optional, int): (supported only by hOn) Define the size of the control packet. Can help with some newer models of ACs that use bigger packets. The default value: 10.
- sensors_packet_size (Optional, int): (supported only by hOn) Define the size of the sensor packet of the status message. Can help with some models of ACs that have bigger sensor packet. The default value: 22, minimum value: 18.
- control_method (Optional, list): (supported only by hOn) Defines control method (should be supported by AC). Supported values: MONITOR_ONLY - no control, just monitor status, SET_GROUP_PARAMETERS - set all AC parameters with one command (default method), SET_SINGLE_PARAMETER - set each parameter individually (this method is supported by some new ceiling ACs like AD71S2SM3FA)
- display (Optional, boolean): Can be used to set the AC display off.
- beeper (Optional, boolean): Can be used to disable beeping on commands from AC. Supported only by hOn protocol.
- supported_modes (Optional, list): Can be used to disable some of AC modes. Possible values: 'OFF', HEAT_COOL, COOL, HEAT, DRY, FAN_ONLY
- supported_swing_modes (Optional, list): Can be used to disable some swing modes if your AC does not support it. Possible values: 'OFF', VERTICAL, HORIZONTAL, BOTH
- supported_presets (Optional, list): Can be used to disable some presets. Possible values for smartair2 are: AWAY, BOOST, COMFORT. Possible values for hOn are: AWAY, ECO, BOOST, SLEEP. AWAY preset can be enabled only in HEAT mode, it is disabled by default
- on_alarm_start (Optional, Automation): (supported only by hOn) Automation to perform when AC activates a new alarm. See on_alarm_start Trigger
- on_alarm_end (Optional, Automation): (supported only by hOn) Automation to perform when AC deactivates a new alarm. See on_alarm_end Trigger
- on_status_message (Optional, Automation): Automation to perform when status message received from AC. See on_status_message Trigger
- All other options from Climate.
This automation will be triggered when a new alarm is activated by AC. The error code of the alarm will be given in the variable code (uint8_t), error message in the variable message (const char *). Those variables can be used in lambdas
climate:
  - protocol: hOn
    on_alarm_start:
      then:
        - logger.log:
            level: WARN
            format: "Alarm activated. Code: %d. Message: \"%s\""
args: [ 'code', 'message' ]This automation will be triggered when a previously activated alarm is deactivated by AC. The error code of the alarm will be given in the variable code (uint8_t), error message in the variable message (const char *). Those variables can be used in lambdas
climate:
  - protocol: hOn
    on_alarm_end:
      then:
        - logger.log:
            level: INFO
            format: "Alarm deactivated. Code: %d. Message: \"%s\""
args: [ 'code', 'message' ]This automation will be triggered when component receives new status packet from AC. Raw message binary (without header and checksum) will be provided in the variable data (const char *), message length in the variable data_size (uint8_t). Those variables can be used in lambdas
This trigger can be used to support some features that unique for the model and not supported by others.
climate:
  - protocol: hOn
    on_status_message:
      then:
        - logger.log:
            level: INFO
            format: "New status message received, size=%d, subcmd=%02X%02X"
args: [ 'data_size', 'data[0]', 'data[1]' ]This action turns AC power on.
on_...:
  then:
climate.haier.power_on: device_idThis action turns AC power off
on_...:
  then:
climate.haier.power_off: device_idThis action toggles AC power
on_...:
  then:
climate.haier.power_toggle: device_idThis action turns the AC display on
on_...:
  then:
climate.haier.display_on: device_idThis action turns the AC display off
on_...:
  then:
climate.haier.display_off: device_idTurn on health mode (UV light sterilization)
on_...:
  then:
climate.haier.health_on: device_idTurn off health mode
on_...:
  then:
climate.haier.health_off: device_id(supported only by hOn) This action enables beep feedback on every command sent to AC
on_...:
  then:
climate.haier.beeper_on: device_id(supported only by hOn) This action disables beep feedback on every command sent to AC (keep in mind that this will not work for IR remote commands)
on_...:
  then:
climate.haier.beeper_off: device_id(supported only by hOn) Set direction for vertical airflow if the vertical swing is disabled. Possible values: Health_Up, Max_Up, Up, Center, Down, Health_Down.
on_...:
  then:
    - climate.haier.set_vertical_airflow:
      id: device_id
vertical_airflow: Up(supported only by hOn) Set direction for horizontal airflow if the horizontal swing is disabled. Possible values: Max_Left, Left, Center, Right, Max_Right.
on_...:
  then:
    - climate.haier.set_horizontal_airflow:
      id: device_id
vertical_airflow: Right(supported only by hOn) Start self-cleaning
on_...:
  then:
- climate.haier.start_self_cleaning: device_id(supported only by hOn) Start 56°C steri-cleaning
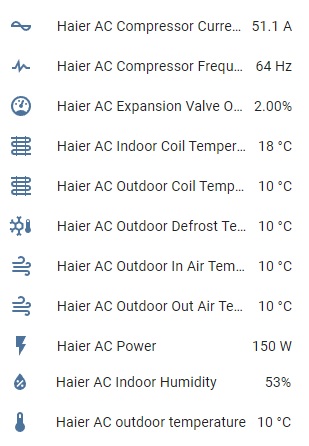
Additional sensors for Haier Climate device. These sensors are supported only by the hOn protocol.
# Example configuration entry
sensor:
  - platform: haier
    haier_id: haier_ac
    outdoor_temperature:
      name: Haier outdoor temperature
    humidity:
      name: Haier Indoor Humidity
    compressor_current:
      name: Haier Compressor Current
    compressor_frequency:
      name: Haier Compressor Frequency
    expansion_valve_open_degree:
      name: Haier Expansion Valve Open Degree
    indoor_coil_temperature:
      name: Haier Indoor Coil Temperature
    outdoor_coil_temperature:
      name: Haier Outdoor Coil Temperature
    outdoor_defrost_temperature:
      name: Haier Outdoor Defrost Temperature
    outdoor_in_air_temperature:
      name: Haier Outdoor In Air Temperature
    outdoor_out_air_temperature:
      name: Haier Outdoor Out Air Temperature
    power:
name: Haier Power- haier_id (Required, ID): The id of haier climate component
- outdoor_temperature (Optional): Temperature sensor for outdoor temperature. All options from Sensor.
- humidity (Optional): Sensor for indoor humidity. Make sure that your climate model supports this type of sensor. All options from Sensor.
- compressor_current (Optional): Sensor for climate compressor current. Make sure that your climate model supports this type of sensor. All options from Sensor.
- compressor_frequency (Optional): Sensor for climate compressor frequency. Make sure that your climate model supports this type of sensor. All options from Sensor.
- expansion_valve_open_degree (Optional): Sensor for climate's expansion valve open degree. Make sure that your climate model supports this type of sensor. All options from Sensor.
- indoor_coil_temperature (Optional): Temperature sensor for indoor coil temperature. Make sure that your climate model supports this type of sensor. All options from Sensor.
- outdoor_coil_temperature (Optional): Temperature sensor for outdoor coil temperature. Make sure that your climate model supports this type of sensor. All options from Sensor.
- outdoor_defrost_temperature (Optional): Temperature sensor for outdoor defrost temperature. Make sure that your climate model supports this type of sensor. All options from Sensor.
- outdoor_in_air_temperature (Optional): Temperature sensor incoming air temperature. All options from Sensor.
- outdoor_out_air_temperature (Optional): Temperature sensor for outgoing air temperature. All options from Sensor.
- power (Optional): Sensor for climate power consumption. Make sure that your climate model supports this type of sensor. All options from Sensor.
Additional sensors for Haier Climate device. These sensors are supported only by the hOn protocol.

# Example configuration entry
binary_sensor:
  - platform: haier
    haier_id: haier_ac
    compressor_status:
      name: Haier Outdoor Compressor Status
    defrost_status:
      name: Haier Defrost Status
    four_way_valve_status:
      name: Haier Four Way Valve Status
    indoor_electric_heating_status:
      name: Haier Indoor Electric Heating Status
    indoor_fan_status:
      name: Haier Indoor Fan Status
    outdoor_fan_status:
name: Haier Outdoor Fan Status- haier_id (Required, ID): The id of haier climate component
- compressor_status (Optional): A binary sensor that indicates Haier climate compressor activity. All options from Binary Sensor.
- defrost_status (Optional): A binary sensor that indicates defrost procedure activity. All options from Binary Sensor.
- four_way_valve_status (Optional): A binary sensor that indicates four way valve status. All options from Binary Sensor.
- indoor_electric_heating_status (Optional): A binary sensor that indicates electrical heating system activity. All options from Binary Sensor.
- indoor_fan_status (Optional): A binary sensor that indicates indoor fan activity. All options from Binary Sensor.
- outdoor_fan_status (Optional): A binary sensor that indicates outdoor fan activity. All options from Binary Sensor.
Additional sensors for Haier Climate device. These sensors are supported only by the hOn protocol.
# Example configuration entry
text_sensor:
  - platform: haier
    haier_id: haier_ac
    appliance_name:
      name: Haier appliance name
    cleaning_status:
      name: Haier cleaning status
    protocol_version:
name: Haier protocol version- haier_id (Required, ID): The id of haier climate component
- appliance_name (Optional): A text sensor that indicates Haier appliance name. All options from Text Sensor.
- cleaning_status (Optional): A text sensor that indicates cleaning status. Possible values "No cleaning", "Self clean", "56°C Steri-Clean". All options from Text Sensor.
- protocol_version (Optional): A text sensor that indicates Haier protocol version. All options from Text Sensor.
Additional buttons for Haier AC cleaning. These buttons are supported only by the hOn protocol.
# Example configuration entry
button:
  - platform: haier
    haier_id: haier_ac
    self_cleaning:
      name: Haier start self cleaning
    steri_cleaning:
name: Haier start 56°C steri-cleaning- haier_id (Required, ID): The id of Haier climate component
- self_cleaning (Optional): A button that starts Haier climate self cleaning. All options from Text Sensor.
- steri_cleaning (Optional): A button that starts Haier climate 56°C Steri-Clean. All options from Text Sensor.
It is strongly recommended to make a backup of the original flash content before flashing ESPHome!
To make a backup and to flash the new firmware you will need to use a USB to TTL converter and solder wires to access UART0 on board (or use something like this: Pogo Pin Probe Clip 2x5p 2.54 mm)
UART0 pinout:
To put the device in the flash mode you will need to shortcut GPIO0 to the ground before powering the device.
Once the device is in flash mode you can make a full backup of the original firmware in case you would like to return the module to its factory state. To make a backup you can use esptool. Command to make a full flash backup:
python esptool.py -b 115200 –port read_flash 0x00000 0x400000 flash_4M.bin
After this, you can flash firmware using ESPHome tools (dashboard, website, esphome command, etc) .. Generated from additional_information.rst