Imaging is a dirty word! Here are resources from my part of this presentation at MacADUK (26th March 2019, Prospero House, London). I was deeply humbled and honoured to share the stage with the one and only Joel Rennich, director of Jamf Connect, at Jamf. My focus centred around leveraging new functionality in NoMAD Login AD to help automate MDM based provisioning workflows WITHOUT needing to log in as part of the process. We delved into a couple of NoMAD Login's specific parts, or "mechs"; User Input and Notify, walking through one example of how to drive them during the enrolment and provisioning process. Below is an adaptation and simplification of the methods used in my university's environment.
Click here for the presentation slides
Click the image below to watch the video
A 45 minute conference slot is by no means enough time to cover every aspect of provisioning (the key word in the title is "Improve"!). I did assume some prerequisite knowledge from the audience, but if you're just embarking on this journey, welcome! The links below will help you get started. I will update the list with links to conference videos from MacADUK as they are made available. There were some awesome sessions that'll really help you get things going.
Lab Nauseum - Dawn Of The DEP (my talk from last year's Jamf Nation Roadshow and the precursor to this) - https://github.com/neilmartin83/Jamf-Nation-Roadshow-London-2018
If you aren‘t getting Apple push notifications - https://support.apple.com/en-gb/HT203609
2017: A Push Odyssey — Journey to the Center of APNS - https://www.youtube.com/watch?v=nXjEevMtwa4
Use Device Enrollment - https://support.apple.com/en-gb/HT204142
Apple Device Enrollment Program Guide - https://www.apple.com/education/docs/DEP_Guide.pdf
macOS Installation: Strange New World - https://scriptingosx.com/2018/05/macos-installation-strange-new-world/
macOS Installation for Apple Administrators - https://scriptingosx.com/macos-installation-for-apple-administrators/
Grab NoLoAD here: https://gitlab.com/orchardandgrove-oss/NoMADLogin-AD.
I focused on the 1.3.0 release (or rather, its release candidate - so there may be subtle differences from the stable one - live on the bleeding edge!).
Join the MacAdmins Slack: https://macadmins.herokuapp.com/ - check out the #nomad-login channel, hang out with the developers and users, get involved with testing, ask questions, discuss and enjoy.
NoLoAD includes some new shiny things that make it so much more than a login window replacement that creates local accounts from AD credentials (which is awesome in itself). It could now be considered as an extension to Apple's Setup Assistant, giving admins much-needed capabilities during DEP based enrolment.
The important thing to take away is this: NoLoAD is modular. You get to choose which parts you use. Ironically, in my environment, we join Macs to Active Directory so we're not using the login window functionality.
Notify
This mech provides you with a "status screen" showing information about what's happening, with your company's branding added. This is DEPNotify but rolled into NoLoAD so it can run at the Login Window, as opposed to DEPNotify, which can't. It's configured and driven in mostly the same way. See https://gitlab.com/Mactroll/DEPNotify for more details (and check out my presentation video and slides above!).

User Input
This provides a framework for creating a dialog at the login window to accept input from the user in the form of text fields and drop-down menus. The results are saved to an XML property list you can have your management tools read from during your provisioning process. It's not configured in quite the same way as DEPNotify's User Input is. See my example Configuration Profile below.

I spoke about this thing called authchanger - an awesome little tool that easily and safely modifies the list of authentication mechanisms macOS uses when it boots and when a user logs in. It's included in the packaged version of NoLoAD and we can use it to achieve a few goals:
- Replace Apple's login window with NoLoAD's one.
- Specify which of NoMAD's "mechs" you want to use and the order you want to use them.
- Reset everything back to using Apple's login window.
For more information, run authchanger -help
Examples:
- Show the current Authorisation DB settings:
authchanger -print - Replace Apple's login window with NoLoAD:
authchanger -reset -AD - Make NoLoAD start with Notify mech only
authchanger -reset -preLogin NoMADLoginAD:Notify - Make NoLoAD start with User Input then progress to Notify after User Input has been received (when the user clicks the button):
authchanger -reset -preLogin NoMADLoginAD:UserInput NoMADLoginAD:Notify - Reset everything back to use Apple's login window:
authchanger -reset
After you run authchanger you'll need to restart the Mac or kill the loginwindow process to force NoLoAD to reload with your changes (or to get rid of it if you're going back to the regular login window).
This configuration profile sets up NoLoAD's user input and notify mechs. See the table below for details about the keys I used (note that there are more!):
| Key | Type | Mech used | Description | Example Value |
|---|---|---|---|---|
| BackgroundImage | String | All | Path to an image file used as the background when NoLoAD is running | /path/to/image.png |
| NotifyLogStyle | String | Notify | Set this to your management tool so the Notify mech tails its log to report on activities it's performing | jamf |
| UserInputLogo | String | User Input | Path to an image file used as the logo when User Input is running | /path/to/image.png |
| UserInputMainText | String | User Input | Body text for the User Input dialog | Please enter some data |
| UserInputOutputPath | String | User Input | Path to the file where User Input data will be stored | /path/to/output.plist |
| UserInputTitle | String | User Input | Title text for the User Input dialog | Hello World! |
| UserInputUI | Nested dictionaries | User Input | Defines the UI elements for User Input (buttons, popups and text fields). Two of each are supported | Button, PopUps, TextFields |
The UserInputUI key is for defining the buttons, drop-downs (or popups) and text fields of the User Input dialog. Each element is in its own nested dictionary. Some examples:
Button
| Key | Type | Description | Example Value |
|---|---|---|---|
| enabled | Boolean | Shows or hides the button | TRUE |
| title | String | Button title text | OK |
PopUps (drop-down menu)
| Key | Type | Description | Example Value |
|---|---|---|---|
| items | Array of Strings | Items listed under the menu | Student, Staff, Staff Loan |
| title | String | Menu title text | Computer Role |
TextFields
| Key | Type | Description | Example Value |
|---|---|---|---|
| placeholder | String | Shows greyed out text inside the field - used as example text | Type something like this |
| title | String | Text field title text | Computer Name |
There are many more preferences you can manage for NoLoAD. See the full list here: https://gitlab.com/orchardandgrove-oss/NoMADLogin-AD/wikis/Configuration/preferences
In my example, I wanted to have NoLoAD install and be set up so the Notify mech would appear, along with some organisation-specific branding for the background and title images. To achieve this, I repackaged NoLoAD to include our branding imagery and a different postinstall script.
The goal is to install this tweaked package as part of the Jamf PreStage. That makes sure NoLoAD launches right after the Setup Assistant (and we don't see Apple's login window!). This makes use of MDM commands to download and install the package and prevent the Setup Assistant exiting until installation is complete. As such, it requires:
- You have a Jamf Cloud Distribution Point as your master, where the package will be served from.
- The package is signed with an Apple Developer ID certificate.
For details about PreStage packages in Jamf and information on how to obtain and use a Developer ID certificate to sign them, see https://docs.jamf.com/10.10.0/jamf-pro/administrator-guide/Computer_PreStage_Enrollments.html
The requirement to sign your package is true for any MDM solution that uses on the InstallApplication command.
In my example, this script is intended to be ran via a Policy that's triggered on "Enrolment Complete" - this is specific to Jamf; NoLoAD also provides the Scriptrunner mech to execute scripts at the login window, or you could use a Launch Daemon. Those are beyond the scope of my presentation.
The script also makes use of Jamf's parameter functionality: https://www.jamf.com/jamf-nation/articles/146/script-parameters
$4= Jamf Pro Server URL (excluding the port number - 8443 is assumed, edit the script if you use something else)$5= Username for the Jamf Pro Server account doing the API reads/writes (must have privileges to read and update Computers objects, as well as permission to update Users objects)$6= Password for the Jamf Pro Server account doing the API reads/writes
In order to automatically skip asking for user input if the computer record already exists with a name and role, the script reads from and populates these Extension Attributes to the Computer Record via the Jamf API (modify as appropriate for your org, or don't use them if you don't want this little bit of automation):
- Hostname (string)
- Computer Role (string)
We write the computer's hostname to our own Hostname Extension Attribute via the Jamf API during provisioning so it will persist when a Mac is erases with a clean install of macOS (because the actual Computer Name in the Jamf Computer Record changes to the default "iMac" etc value when the freshly re-provisioned Mac re-enrolls).
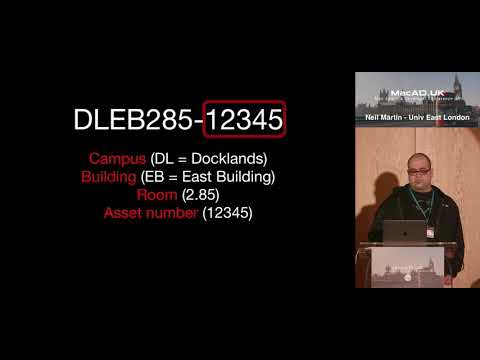
In my environment, the hostname determines which lab a Mac belongs in. So for a hostname of DLEB285-12345:
For example, the first part of the hostname denotes the computer lab, DLEB285 and can be broken down/decoded as follows:
DL: Campus code (Docklands)EB: Building code (East Building)2: Floor code (2nd Floor)85: Room code (Room Number 85)
The second part of the hostname 12345 is an asset number, used for inventory purposes.
Lab Smart Groups are populated based on the computer hostname and role, so for Macs in lab DLEB285 we would use:
| And/Or | Criteria | Operator | Value |
|---|---|---|---|
| --- | Computer Name | like | DLEB285 |
| and | Computer Role | is | Student |
This is specific to my environment but does give some insight into how we can easily create differnt Smart Groups for Macs by campus, building, floor and room.
For each software title, separate Smart Groups are populated based on whether said application (or sometimes package receipt) is present and whether the Macs are in the specific Lab Smart Groups where the software is needed:
| And/Or | Criteria | Operator | Value |
|---|---|---|---|
| --- | Application Title | is not | Firefox.app |
| and ( | Computer Group | member of | Lab DLEB285 |
| or | Computer Group | member of | Lab DLWB123 ) |
In this example, we would get Macs without Firefox that are in labs DLEB285 or DLWB123. Once a Mac in either of those labs has Firefox, it will leave this Smart Group.
For each software title, a separate Policy is created to install it. Each Policy is scoped to its corresponding Smart Group (above). These Policies must have an Update Inventory step included to ensure that Macs leave the scoped Smart Group as soon as they have the application installed.
The Policies all have the same custom trigger: Deploy. This means that you can deploy all the software a specific lab needs with a single command in the provisioning script: jamf policy -event Deploy.
It is possible to go further with version detection and/or using Jamf's patch management policies but that is beyond the scope of my presentation.