How to use LanguageManager
Available since: WebLaF v1.17 release
Required Java version: Java 6 update 30 or any later
Module: core
Usually components/texts translation in application takes a lot of code and additional developer effort, but with WebLaF it is a really simple thing to do and shouldn't take much of your time. I tried to make the LanguageManager and translation system as flexible and simple as it could be.
Core LanguageManager features:
- Structured language dictionaries saved within compact XML files
- Auto-translation of common Swing components using only language keys
- Free access to any dictionary records at any time
- Various features for manual translation and language manipulation operations
I will start with explaining translation XML file format.
Take a look at this small example i cut from actual WebLaF translation:
<Dictionary name="Web Look and Feel language" prefix="weblaf" author="Alee Software" creationDate="27.04.2012">
    <Dictionary name="Library information frame" prefix="info">
        <record key="title">
            <value lang="en">Library information</value>
            <value lang="ru">Информация о библиотеке</value>
            <value lang="pl">Informacje o bibliotece</value>
            <value lang="ar">معلومات عن البرنامج</value>
            <value lang="es">Información de la Librería</value>
            <value lang="fr">Information sur la bibliothèque</value>
            <value lang="pt">Inflormação sobre a biblioteca</value>
            <value lang="de">Bibliotheksinformationen</value>
        </record>
        <Dictionary name="General information tab" prefix="general">
            <record key="title">
                <value lang="en">General</value>
                <value lang="ru">Общие</value>
                <value lang="pl">Ogólny</value>
                <value lang="ar">عام</value>
                <value lang="es">General</value>
                <value lang="fr">Général</value>
                <value lang="pt">Geral</value>
                <value lang="de">Allgemein</value>
            </record>
        </Dictionary>
    </Dictionary>
</Dictionary>
It is a bit of overkill for beginning but that will let you understand its structure better. So the base of everything is Dictionary object - it might have a few settings and contains records or other dictionaries. Using such nested dictionaries allows you to group translations and create some kind of path to each translation. That path is created from dictionary prefixes and record key.
In this specific case there are two paths:
weblaf.info.titleweblaf.info.general.title
I call them "language keys" actually as they will be used in your application to provide component translations or to retrieve translation string directly.
Here is the exact list of Dictionary possible attributes:
-
prefix(string) - dictionary prefix, used for language key path -
id(string) - dictionary unique id, it is usually not required -
name(string) - dictionary name, not required, just an information field -
author(string) - dictionary author, not required, just an information field -
creationDate(dd.MM.yyyy) - dictionary creation date, not required, just an information field -
notes(string) - notes about the dictionary, not required, just an information field
And its content:
-
records(list) - dictionary records -
dictionaries(list) - sub-dictionaries
Every dictionary might contain any amount of records and sub-dictionaries at any place, their order is not strict though might affect overlapping records if such present.
And the Record possible attributes:
-
key(string) - record key - used for language key path -
hotkey(string, for e.g.: "ctrl X") - record hotkey, not required
And its content:
-
values(list) - record values
Every record might contain any amount of values, but each value must have unique language.
So here are Value attributes:
-
lang(string) - value language - used for value selection on translation -
mnemonic(character) - component mnemonic, not required -
hotkey(string, for e.g.: "ctrl X") - component language-specific hotkey, not required
And its content:
-
texts(list) - value texts -
tooltips(list) - value tooltips
Note: Value texts and tooltips can be presented in a few possible ways.
Both text and tooltip added for single value:
<value lang="en" mnemonic="d">
    <text>Show dialog</text>
    <tooltip way="up" delay="0">Dialog display button</tooltip>
</value>
Just text:
<value lang="en" mnemonic="d">
    <text>Show dialog</text>
</value>
This can be shortened to:
<value lang="en" mnemonic="d">Show dialog</value>And the tooltip short version:
<value lang="en" way="up" delay="0" state="tooltip">Dialog display button</value>This was made to simplify and shorten XML file. Of course if you do not add tooltip or text into the value it will not be displayed. But there are a lot of cases when you need simple text for a label or a tooltip for icon-only button.
Anyway, let's continue with the structure objects...
Here are Text attributes:
-
text(string) - text value, exact translation for certain language and state -
state(string) - state for the text, not required, component state for this text value
Usually state value is not used in translation but it might be useful for common or custom components to provide state-dependant translation. You may find an example of such case in next section.
And the last one, Tooltip attributes:
-
text(string) - tooltip text value, tooltip translation for certain language -
type(constant) - tooltip type, not required, eitherswingorweblaf -
way(constant) - tooltip display way, not required, one of:upleftrightdownleadingtrailing -
delay(long) - tooltip display delay, not required, delay in ms
You can specify type attribute to ensure that you will have either Swing or WebLaF tooltip. WebLaF is the default one though but you can always change that using LanguageManager.setDefaultTooltipType ( TooltipType.swing ); method.
There are a lot of cases when part of text that should be translated depends on application data and might be changed from time to time even if language is not modified. I have considered this case and have added a simple but yet powerful feature to support data-dependant translations.
Take a look at this language.xml file:
<Dictionary name="Example" prefix="example" author="mgarin" creationDate="30.04.2014">
    <record key="title">
        <value lang="en">My application - [%s]</value>
        <value lang="ru">Моё приложение - [%s]</value>
    </record>
    <record key="empty">
        <value lang="en">Empty project</value>
        <value lang="ru">Пустой проект</value>
    </record>
</Dictionary>
You might notice that there is %s variable similar to what usually used within String.format() calls. It works the same way and actually uses String.format() method to format the resulting string. This variable will get replaced with actual data provided with the language key when it is initialized.
So, let's move to the code example which uses this language.xml file:
public class Application extends WebFrame
{
    public Application ()
    {
        super ();
        setLanguage ( "example.title", LM.get ( "example.empty" ) );

        getContentPane ().add ( new BorderPanel ( new WebButton ( "Open project", new ActionListener ()
        {
            @Override
            public void actionPerformed ( final ActionEvent e )
            {
                final File file = WebFileChooser.showOpenDialog ( Application.this, ( String ) null );
                if ( file != null )
                {
                    updateLanguage ( ( Object ) file.getName () );
                }
            }
        } ), 60, 250, 60, 250 ) );

        pack ();
        setLocationRelativeTo ( null );
        setDefaultCloseOperation ( WebFrame.EXIT_ON_CLOSE );
        setVisible ( true );
    }

    public static void main ( final String[] args )
    {
        SwingUtilities.invokeLater ( new Runnable ()
        {
            @Override
            public void run ()
            {
                WebLookAndFeel.install ();
                LanguageManager.addDictionary ( Application.class, "resources/language.xml" );
                new Application ();
            }
        } );
    }
}
There are two points where we provide data here, first uses predefined phrase which is also included into the language.xml file and translated:
setLanguage ( "example.title", LM.get ( "example.empty" ) );Second one uses file name as data:
updateLanguage ( ( Object ) file.getName () );Cast here is necessary to point that this is data, not a new language key for this component. In future I will improve this scheme and that cast will not be needed anymore.
So as you can see - when you choose some file, dialog title gets updated with new data and you don't have to provide language key, you just push new data straight into the component and it decides how to use it on its own.
But what if you don't want to push that data each time you need to update the component translation? There is a simple solution for that and might even want to use that solution more often than the first one:
public class Application extends WebFrame
{
    private File file = null;

    public Application ()
    {
        super ();
        setLanguage ( "example.title", new DataProvider<String> ()
        {
            @Override
            public String provide ()
            {
                return file == null ? LM.get ( "example.empty" ) : file.getName ();
            }
        } );

        getContentPane ().add ( new BorderPanel ( new WebButton ( "Open project", new ActionListener ()
        {
            @Override
            public void actionPerformed ( final ActionEvent e )
            {
                final File file = WebFileChooser.showOpenDialog ( Application.this, ( String ) null );
                if ( file != null )
                {
                    Application.this.file = file;
                    updateLanguage ();
                }
            }
        } ), 60, 250, 60, 250 ) );

        pack ();
        setLocationRelativeTo ( null );
        setDefaultCloseOperation ( WebFrame.EXIT_ON_CLOSE );
        setVisible ( true );
    }

    public static void main ( final String[] args )
    {
        SwingUtilities.invokeLater ( new Runnable ()
        {
            @Override
            public void run ()
            {
                WebLookAndFeel.install ();
                LanguageManager.addDictionary ( Application.class, "resources/language.xml" );
                new Application ();
            }
        } );
    }
}
So now instead of raw data (usualy some String) you push DataProvider implementation that will return required data each time component translation is updated. This way you won't need to provide data anymore on each update - you simply call updateLanguage () on component and it will make sure everything is updated on its own.
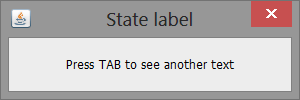
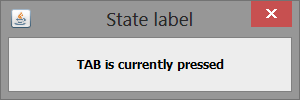
This example uses a bunch of LanguageManager features at once - simple component translation, LanguageUpdater implementation for a custom component and state-dependant translation:
public class LanguageExample
{
    public static void main ( final String[] args )
    {
        WebLookAndFeel.install ();

        // Loading example language dictionary
        LanguageManager.addDictionary ( LanguageExample.class.getResource ( "resources/language.xml" ) );

        // Adding a custom language setter that supports custom states
        LanguageManager.registerLanguageUpdater ( new MyLabelUpdater () );

        // Simple dialog
        final WebDialog myDialog = new WebDialog ();
        myDialog.setLanguage ( "my.dialog.title" );

        // This is our state-dependant component
        final MyLabel myText = new MyLabel ();
        myText.setLanguage ( "my.dialog.text" );
        myDialog.add ( myText );

        myDialog.setSize ( 300, 100 );
        myDialog.setLocationRelativeTo ( null );
        myDialog.setVisible ( true );

        myText.requestFocusInWindow ();
    }

    /**
     * Custom language updater for state support
     */
    public static class MyLabelUpdater extends DefaultLanguageUpdater<MyLabel>
    {
        @Override
        public void update ( final MyLabel c, final String key, final Value value, final Object... data )
        {
            c.setText ( value.getText ( c.isPressed () ? "pressed" : null ) );
        }
    }

    /**
     * Custom label-based component with a new defined "pressed" state
     */
    public static class MyLabel extends WebLabel
    {
        private boolean pressed = false;

        public MyLabel ()
        {
            super ();

            // Configuring label
            setFocusable ( true );
            setFocusTraversalKeysEnabled ( false );
            setHorizontalAlignment ( WebLabel.CENTER );

            // Our specific state change listener
            addKeyListener ( new KeyAdapter ()
            {
                @Override
                public void keyPressed ( final KeyEvent e )
                {
                    if ( Hotkey.TAB.isTriggered ( e ) )
                    {
                        pressed = true;
                        LanguageManager.updateComponent ( MyLabel.this );
                    }
                }

                @Override
                public void keyReleased ( final KeyEvent e )
                {
                    if ( Hotkey.TAB.isTriggered ( e ) )
                    {
                        pressed = false;
                        LanguageManager.updateComponent ( MyLabel.this );
                    }
                }
            } );
        }

        public boolean isPressed ()
        {
            return pressed;
        }
    }
}
So let me explain each part of it.
First of all - LanguageManager have to be initialized, otherwise it will not function. This may be done by installing WebLaF (like in this example) or calling manager initialization separately:
LanguageManager.initialize ();As a next step we are adding our dictionary file so that LanguageManager can read it and cache all the data required to render translations.
With the next step we are registering our custom LanguageUpdater implementation, which is pretty simple:
public static class MyLabelUpdater extends DefaultLanguageUpdater<MyLabel>
{
    @Override
    public void update ( final MyLabel c, final String key, final Value value, final Object... data )
    {
        c.setText ( value.getText ( c.isPressed () ? "pressed" : null ) );
    }
}
To put it simple - LanguageUpdater defines language translation taken by the component. In this case it simply returns value according to our custom component state. Instead of our custom component there might be a button checking its pressed state, a textfield checking its focused state or anything else - just use your imagination.
And here is what we will see as a result:
If you really hate using XML or have some other reasons to avoid it you might add translation directly from the code. Here are the language data classes:
com.alee.managers.language.data.Dictionary
com.alee.managers.language.data.Record
com.alee.managers.language.data.Value
com.alee.managers.language.data.Text
com.alee.managers.language.data.Tooltip
There are a lot of methods inside them that will help you to construct dictionaries manually. Here is a brief example how it can be done:
final Dictionary dictionary = new Dictionary ( "weblaf" );

final Dictionary custom = new Dictionary ( "custom", "Custom stuff", "Mikle Garin" );
custom.addRecord ( "name", "en", "Mikle" );
custom.addRecord ( "name", "ru", "Михаил" );
custom.addRecord ( "surname", new Value ( "en", "Garin" ), new Value ( "ru", "Гарин" ) );
custom.addRecord ( new Record ( "call", "C", new Value ( "en", "Make a call" ), new Value ( "ru", "Вызвать" ) ) );
dictionary.addSubdictionary ( custom );

final Dictionary example = new Dictionary ( "example", "Custom stuff", "Mikle Garin" );
example.addRecord ( "lang", new Value ( "en", "Language" ), new Value ( "ru", "Язык" ) );
dictionary.addSubdictionary ( example );
As a result we will have next translation keys available:
weblaf.custom.nameweblaf.custom.surnameweblaf.custom.callweblaf.example.lang
I would really appreciate any feedback you might send to me about current WebLaF translation and possible issues/typos in its text (i bet some are still there!).
I also want to add more different languages into default WebLaF translation but unfortunately I know only a few languages which are already included. So I would really appreciate if you are able to create and send me WebLaF translation based on the latest WebLaF language file - I will include into WebLaF right away.