These are the dotfiles for the RotorHazard timers on a Raspberry Pi. It is recommended that you install the additional packages only if you are using a Raspberry Pi 4 with enough RAM, to avoid slowing down your Pi.
- Git (by default this is not installed in Raspberry Pi OS)
Once you meet the prerequirements, you can clone the project and install the dotfiles:
git clone https://github.com/dutchdronesquad/timer-dotfiles.git
cd ~/timer-dotfiles && bash install.shThe following platforms are installed and set up by default with the bash script:
pyenv install --list | grep -E '^  3\.(10|11|12)\.[0-9]+$'
pyenv install 3.11.x
pyenv global 3.11.xgit config --global user.name "Dutch Drone Squad"
git config --global user.email "[email protected]"Version 20 is currently the LTS version.
nvm install 20
nvm use 20
nvm alias default 20First check your python version and if not install one with pyenv before continuing with the RotorHazard installation.
Use the command below to install RotorHazard, the script is also suitable for use with NuclearHazard PCBs. I would recommend using python version 3.11 or 3.12.
Development:
- Uses git clone, so you can easily work with branches and commits
- You have the choice to clone from your own fork
- There is no update script, I assume you know how git works
- Automatically creates a venv for you and installs the necessary packages from PyPi
- Asks if you want to setup raspi-config and RotorHazard service
Production:
- Uses wget to retrieve the code
- You have the option to install or update
- You can indicate which version you want to install
- Automatically creates a venv for you and installs the necessary packages from PyPi
- Creates the RotorHazard service and sets the raspi-config correctly
When running the bash script below you have the option to install RotorHazard for development or production purposes.
cd ~/timer-dotfiles/components && bash rotorhazard.shDuring installation it will ask which GPIO pin you want to use, this concerns the shutdown button and differs per type of PCB you use.
RotorHazard = GPIO18 NuclearHazard = GPIO19
If you opted for development, don't forget to check if an upstream repository is set, as this will make it easier to pull changes from the RotorHazard project.
git remote -v
git remote add upstream https://github.com/RotorHazard/RotorHazard.gitBy default you will be asked if you want to setup raspi-config and the RotorHazard service, if you want to do this later you can run the following commands.
Set the correct raspi-config and boot file settings:
cd ~/timer-dotfiles/components/scripts && bash pi-config.shInstall the RotorHazard startup service:
cd ~/timer-dotfiles/components/scripts && bash rh-service.shNote: If you use a username other than pi, first edit the service file with your corresponding username.
With the bash script below you can install the FPVScores plugin, you can choose between development or non-development and if the plugin already exists whether you want to overwrite it.
cd ~/timer-dotfiles/components && bash fpvscores.shcd ~/timer-dotfiles/components && bash stream-overlays.shFor example DDS uses: dds-rotorhazard[number] (by default the hostname is raspberrypi).
- Open the TUI of Network Manager with:
sudo nmtui- Go to
Set system hostname. - Change the hostname for something you want and press
OK.
When you have completed these steps, reboot the Raspberry Pi and you are done.
- Create a .ssh folder using
install.
install -d -m 700 ~/.ssh- Create a
authorized_keysfile and paste your public_key into it:
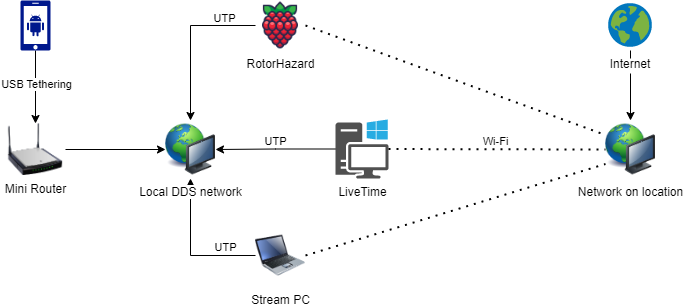
nano ~/.ssh/authorized_keysThe race timers are wired to our local intranet network by default, however when a Raspberry Pi is also connected to Wi-Fi it gives priority to the ethernet interface by default. However, this causes problems in the way we work during the training events.
We therefore need to prioritize wireless over wired by adjusting the metric in Network Manager:
- First check your current connections with:
nmcli connection- Change the metric with:
Note: The metric is the priority of the interface. The lower the number, the higher the priority.
sudo nmcli connection modify "Wired connection 1" ipv4.route-metric 1000You can check the current priority of the interfaces with the following command:
nmcli- Restart the wired connection:
nmcli connection down "Wired connection 1" && nmcli connection up "Wired connection 1"You can also create new connections via Network Manager, this can be done via the TUI or CLI.
The device should be in range of the Wi-Fi network you want to connect to.
sudo nmcli dev wifi connect "wifi name" password "password"or if you want the password to be asked as input
sudo nmcli --ask dev wifi connect "wifi name"To open the TUI of Network Manager, run the following command:
sudo nmtuiIf you are in range of the Wi-Fi network you want to connect to, you do the following:
- Go to
Activate a connection. - Select the Wi-Fi network you want to connect to and press
Activate. - Enter the password and press
OK.
If you are not in range of the Wi-Fi network you want to connect to, you can create a new connection:
- Go to
Edit a connectionand pressEnter. - Select
Addand pressEnter. - Select
Wi-Fiand pressEnter. - Change the
Profile nameand set theSSIDto the name of the Wi-Fi network you want to connect to. - Under
Securityselect the correct security type and enter the password. - Go to the bottom and select
OKand pressEnter. - Go to
Activate a connectionand pressEnter. - Select the connection you just created and press
Enter.
Read more about this here.
Certain parts were inspired by the Aaronsss RH-Setup repository.
Distributed under the MIT License. See LICENSE for more information.


