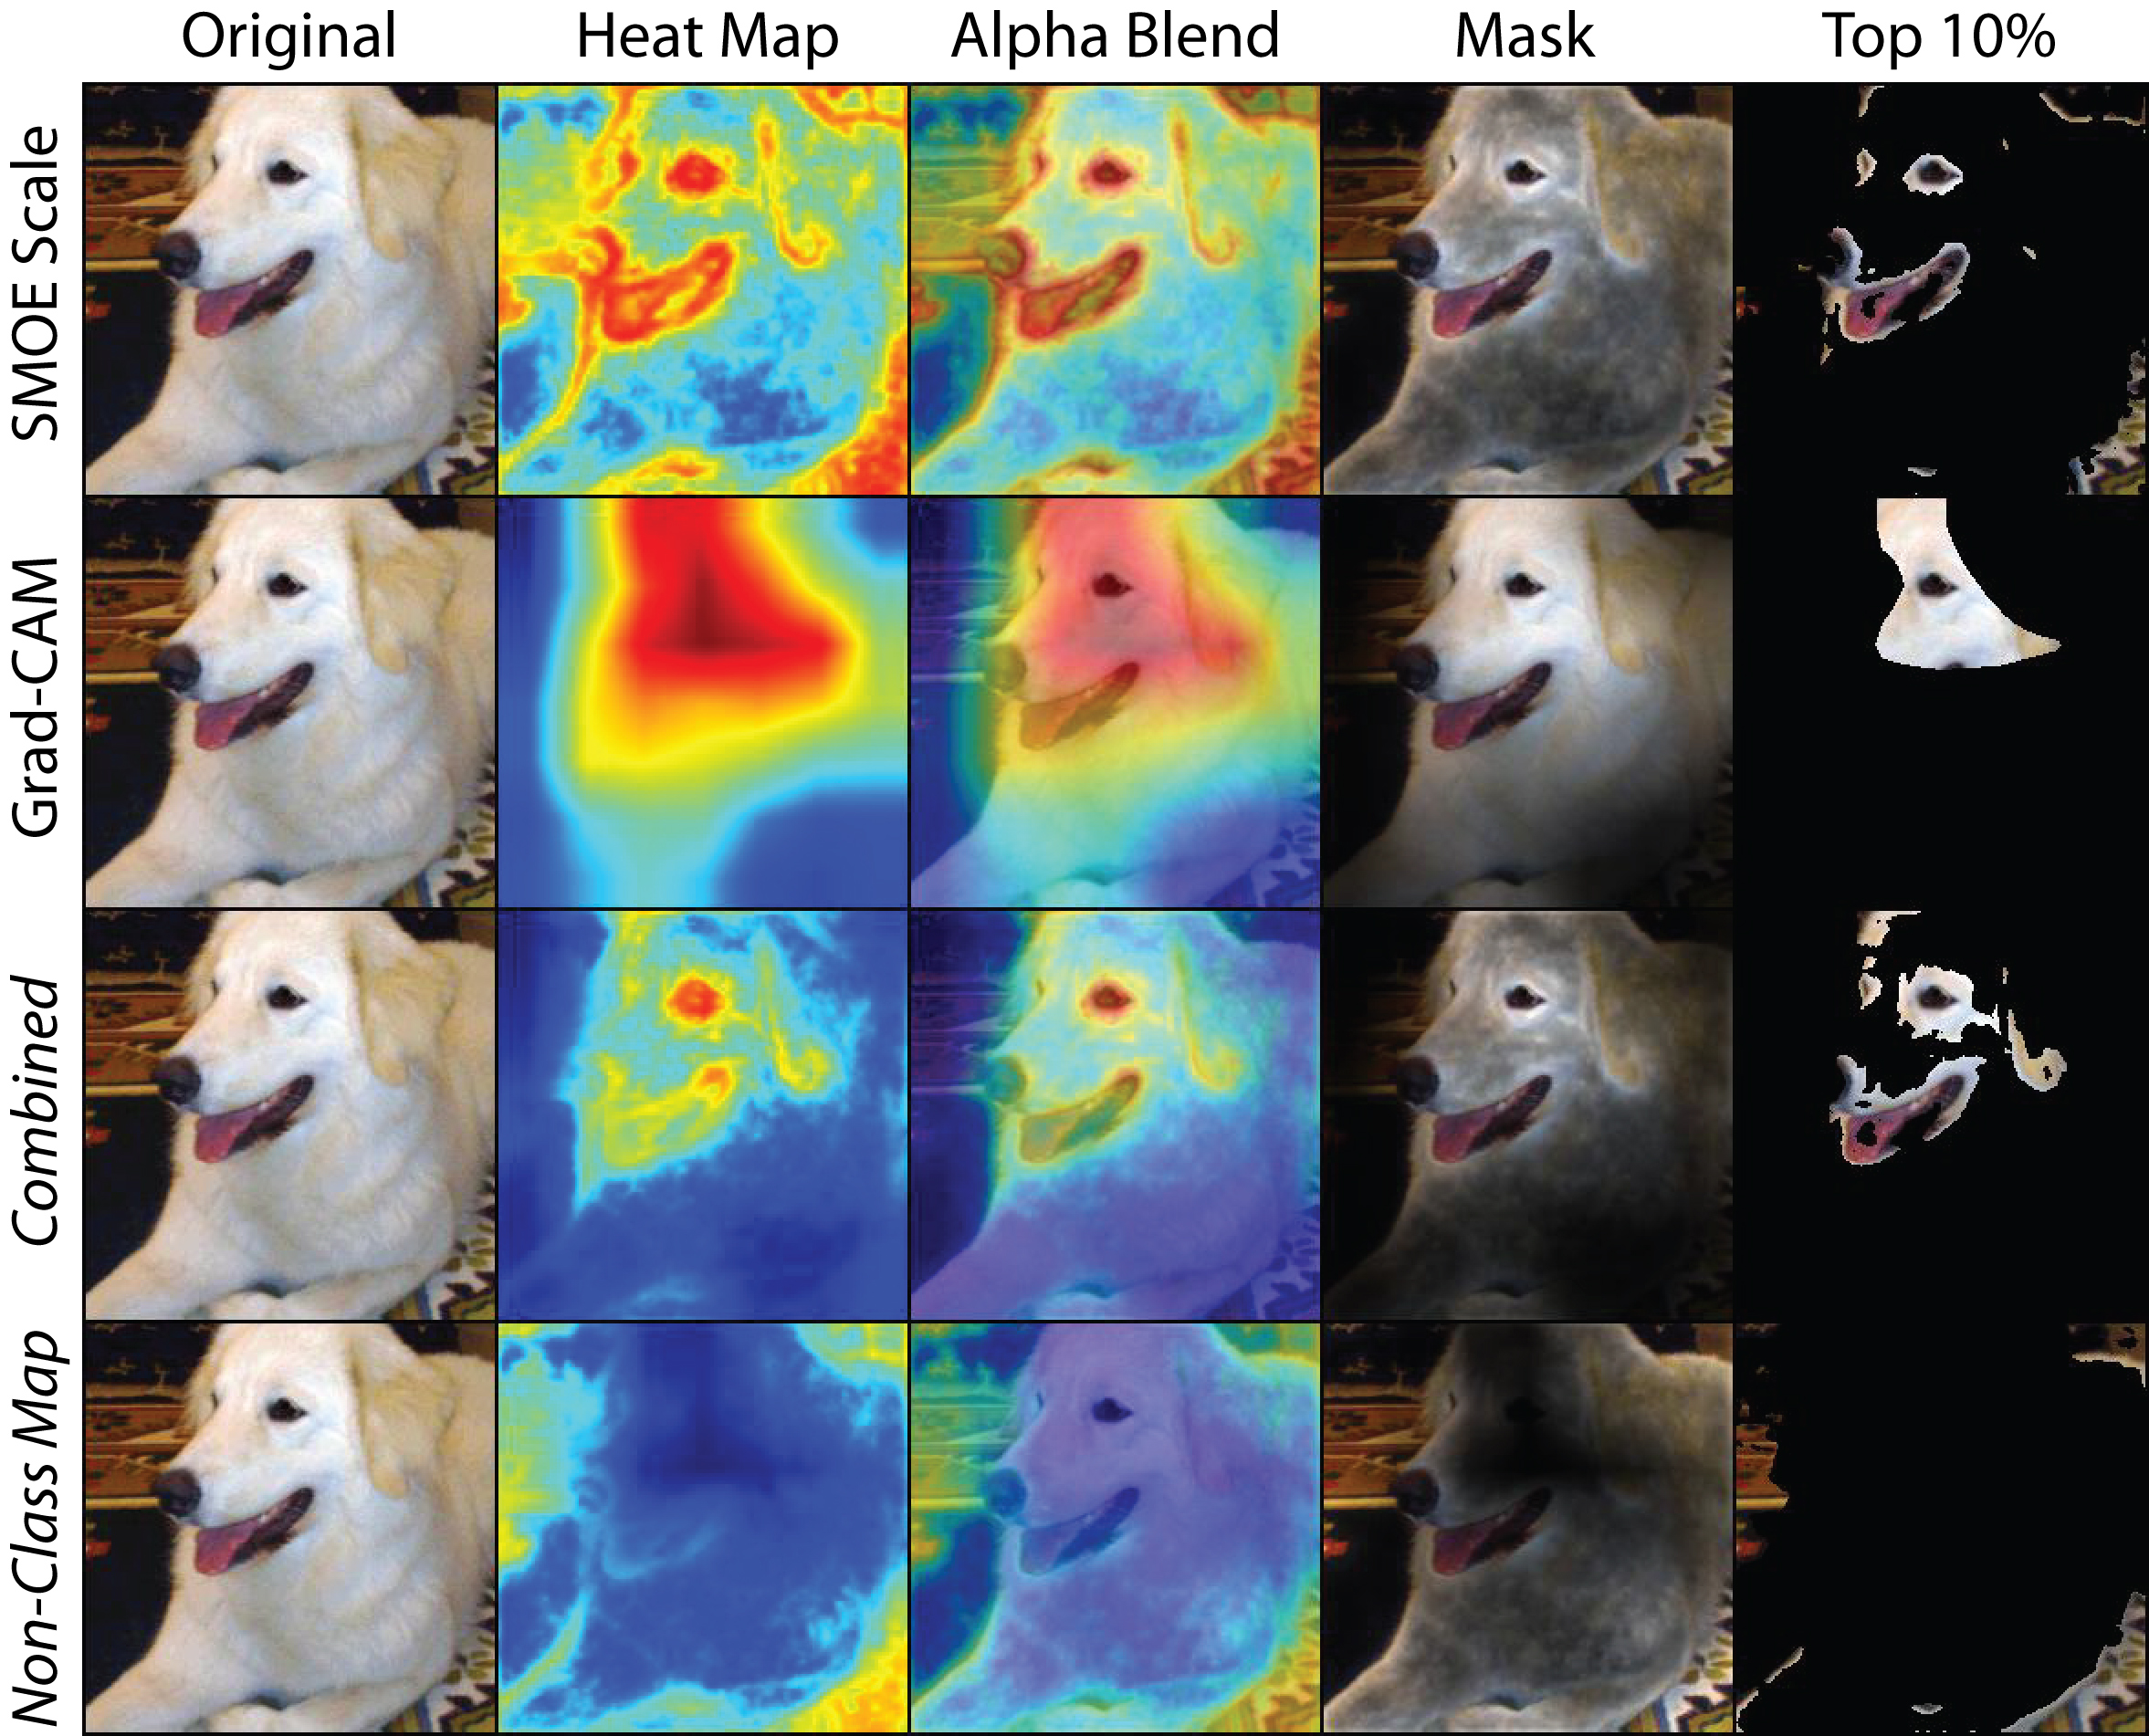
FastCAM creates a saliency map using SMOE Scale saliency maps as described in our paper on ArXiv:1911.11293. We obtain a highly significant speed-up by replacing the Guided Backprop component typically used alongside GradCAM with our SMOE Scale saliency map. Additionally, the expected accuracy of the saliency map is increased slightly. Thus, FastCAM is three orders of magnitude faster and a little bit more accurate than GradCAM+Guided Backprop with SmoothGrad.
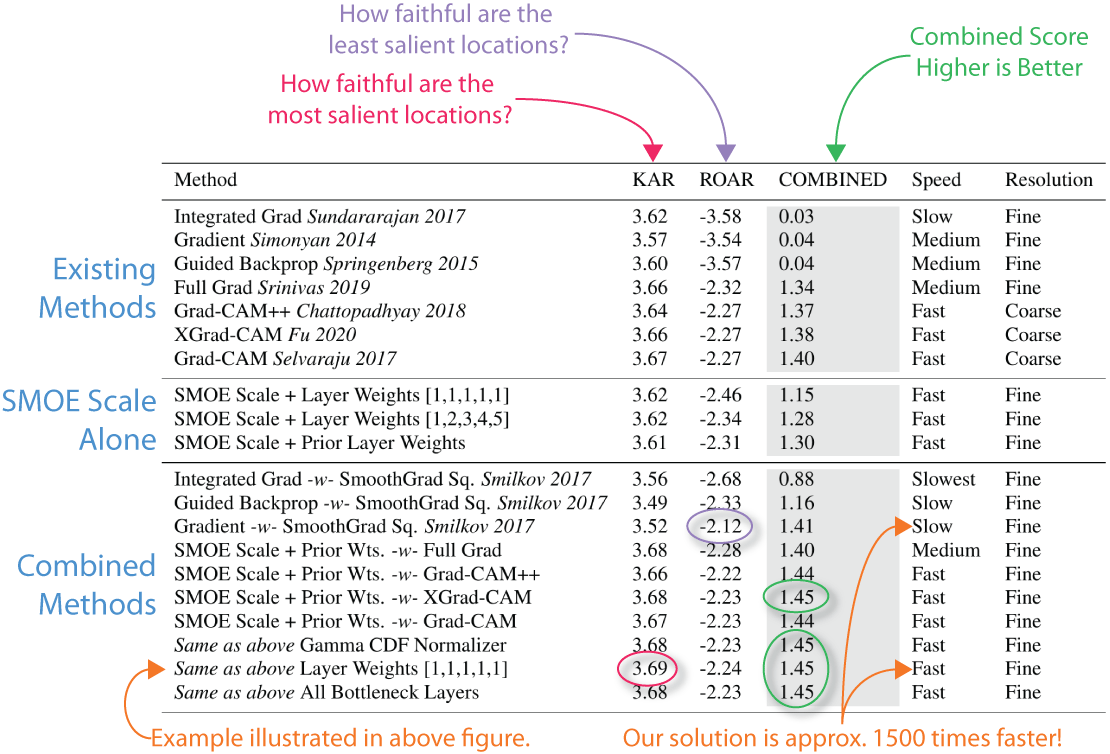
FastCAM is not only fast, but it is more accurate than most methods. The following is a list of ROAR/KAR ImageNet scores for different methods along with notes about performance. In gray is the total ROAR/KAR score. Higher is better. The last line is the score for the combined map you see here.
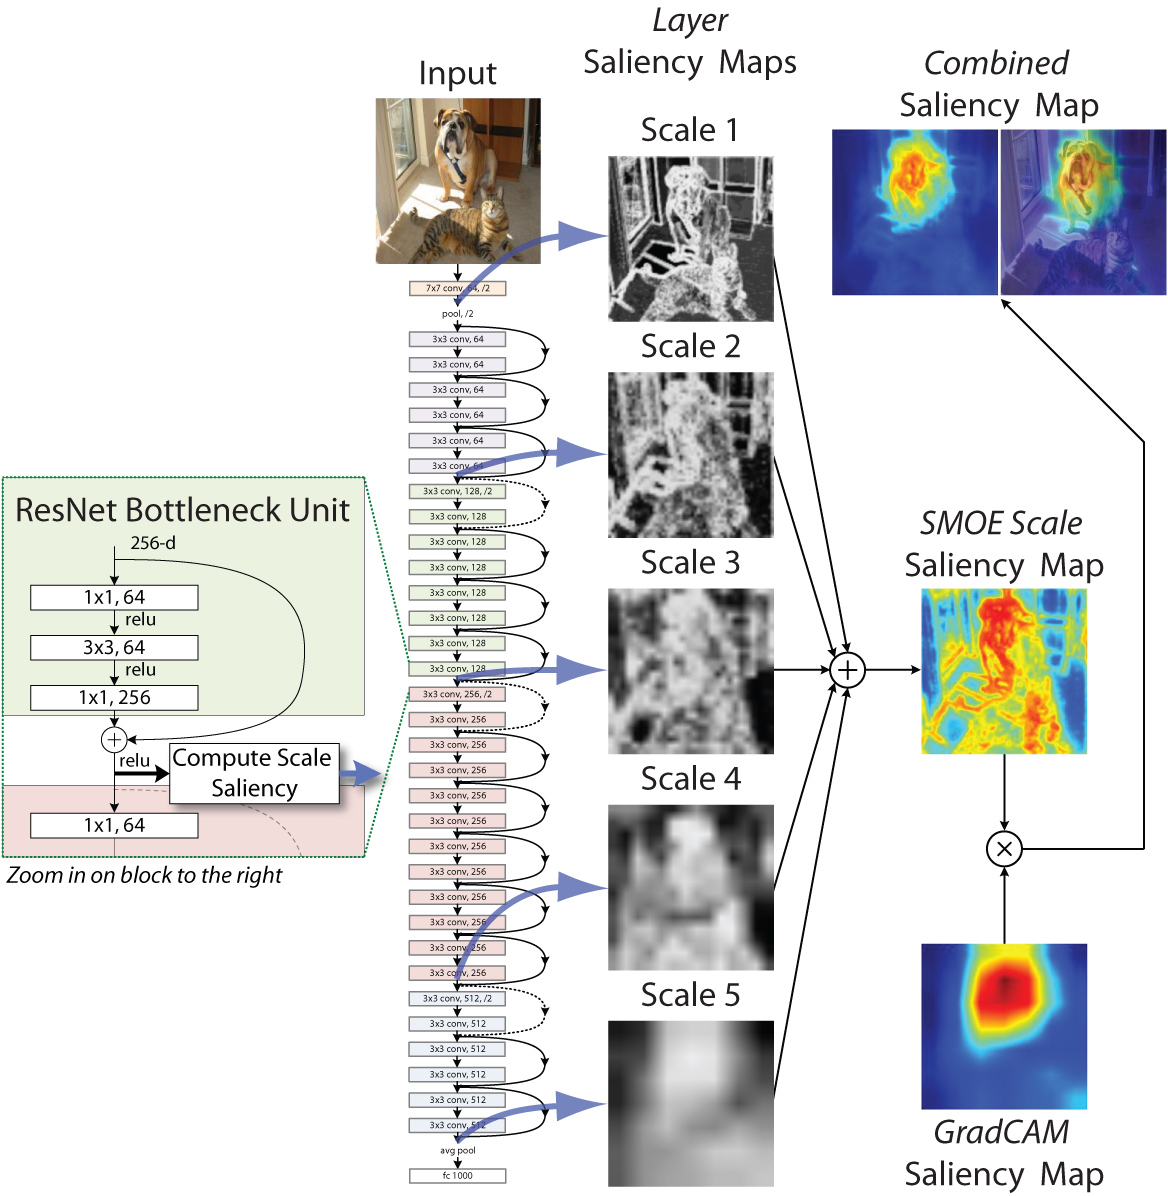
We compute the saliency map by computing the conditional entropy between the mean activation in a layer and the individual values. This gives us the SMOE Scale for a given layer. We apply this to the layer at the end of each spatial scale in the network and then take a weighted average. Finally, we combine it with GradCAM by multiplying the combined SMOE Scale saliency map with the GradCAM saliency map.
The FastCAM package runs on Python 3.x. The package should run on Python 2.x. However, since the end of product life for 2.x has been announced, we will not actively support it going forward. All extra requirements are available through pip installation. On IBM Power based architecture, some packages may have to be hand installed, but it's totally doable. We have tested on Linux, MacOS and Windows. Let us know if you have any issues.
The primary functionality is demonstrated using a Jupyter notebook. By following it, you should be able to see how to use FastCAM on your own deep network.
When you run the installation, these packages should automatically install for you.
numpy
jupyterlab
notebook
torch
torchvision
opencv-python
pytorch_gradcam
This will run our Jupyter Notebook on your local computer.
Optionally if you don't care how it runs and just want to run it, use our simplified notebook.
Double Optionally if you just want to run it and really really really don't care about how it works, use our notebook for the exceptionally impatient.
Experimentally we have a PyTorch Captum framework version of FastCAM.
These are our recommended installation steps:
git clone [email protected]:LLNL/fastcam.git
or
git clone https://github.com/LLNL/fastcam.git
then do:
cd fastcam
python3 -m venv venv3
source venv3/bin/activate
pip install -r requirements.txt
Next you will need to start the jupyter notebook:
jupyter notebook
It should start the jupyter web service and create a notebook instance in your browser. You can then click on
demo_fast-cam.ipynb
To run the notebook, click on the double arrow (fast forward) button at the top of the web page.
1. You don't need a GPU
Because FastCAM is ... well ... fast, you can install and run the demo on a five-year-old MacBook without GPU support. You just need to make sure you have enough RAM to run a forward pass of ResNet 50.
2. Pillow Version Issue
If you get:
cannot import name ‘PILLOW_VERSION’
This is a known weird issue between Pillow and Torchvision, install an older version as such:
pip install pillow=6.2.1
3. PyTorch GradCAM Path Issue
The library does not seem to set the python path for you. You may have to set it manually. For example in Bash, we can set it as such:
export PYTHONPATH=$PYTHONPATH:/path/to/my/python/lib/python3.7/site-packages/
If you want to know where that is, try:
which python
you will see:
/path/to/my/python/bin/python
Questions, concerns and friendly banter can be addressed to:
T. Nathan Mundhenk [email protected]
FastCAM is distributed under the BSD 3-Clause License.
LLNL-CODE-802426


